Planning a tenant – Planning and Implementing a Microsoft 365 Tenant

There are a number of early planning stages for a Microsoft 365 tenant, but the one you’re presented with first will be which kind of subscription and tenant you acquire. Tenants and subscriptions are available for different sizes of organizations as well as different industry verticals. Depending on what options you choose, you may not be able to easily change plans without performing a migration (for example, when moving between Microsoft 365 Commercial and Microsoft 365 GCC).

Selecting a tenant type

Microsoft has made a variety of packages available, targeting different types of organizations, as shown in Figure 1.1:
Figure 1.1 – Types of tenants

Tenant type deep dive

The MS-100 exam focuses on the feature set and product or service bundles available in Microsoft 365 Enterprise plans, though the technologies available are largely the same across all plans. Microsoft 365 for US Government is available only for local, state, and federal government customers (and their partners or suppliers) and has a subset of the currently commercially available features, trailing by anywhere from 6 months to 2 years, depending on the certification level of the environment. Microsoft 365 for Education has the same feature set as the commercial enterprise set, with a few added features targeted to educational institutions. Microsoft 365 for Education is only available to schools and universities.

Selecting a managed domain

After choosing what type of subscription and tenant you’ll acquire, one of the next steps you’ll be faced with is naming your tenant. When you sign up for a Microsoft 365 subscription, you are prompted to choose a name in the Microsoft onmicrosoft.com managed namespace. The name you select will need to be unique across all other Microsoft 365 customers.

Tenant name considerations

The tenant name (or managed domain name) cannot be changed after it has been selected. As such, it’s important to select one that is appropriate for your organization. The tenant name is visible in a handful of locations, so be sure to select a name that doesn’t reveal any private information and looks professionally appropriate for the type of organization you’re representing.

Services – Planning and Implementing a Microsoft 365 Tenant-1

The Services tab displays settings available for workloads, services, and features available in the Microsoft 365 tenant. The following table lists the services that have configurable options in the tenant.


Service


Description


Adoption Score


Manage privacy levels for Adoption Score as well as setting the scope for users to be included or excluded.


Azure Speech Services


Manage whether Azure Speech Services can work using content in your tenant to improve the accuracy of speech services. Disabled by default.


Bookings


Choose whether the Bookings service is available for use in the tenant. If Bookings is enabled, you also manage specific options, such as whether social sharing options are available or whether Bookings can be used by users outside the organization as well as restricting the collection of customer data.


Briefing email from Microsoft Viva


Choose whether to allow users to receive the Viva briefing email. By default, the briefing email is enabled. Users can unsubscribe themselves.


Calendar


Choose whether to enable users to share the calendar outside the organization. If sharing is enabled, choose what level of detail is supplied.


Cortana


Choose whether to allow Cortana on devices to connect to data in your Microsoft 365 tenant.


Directory synchronization


Provides a link to download the Azure AD Connect synchronization tool.


Dynamics 365 Applications


Choose whether to allow insights for each user, aggregated insights for other users (non-identifiable), and identifiable insights for other users.


Dynamics 365 Customer Voice


Configure email parameters for collecting survey data from Dynamics 365.


Mail


There are no org-wide settings to manage here; however, there are links to various tools in the Exchange admin center and the Microsoft Defender 365 portal for things such as transport rules and anti-malware policies.


Microsoft Azure Information Protection


There are no settings to manage for this feature; it is a link to documentation for configuring Azure Information Protection settings.


Microsoft communication to users


Choose whether to enable Microsoft-generated training and education content delivery to users.


Microsoft Edge product messaging for users


Provides information on configuring the Edge spotlight experience for end users.


Microsoft Edge site lists


Manage lists of sites and specify which browser experience (Edge or Internet Explorer) users should receive when navigating to those sites.


Microsoft Forms


Manage external sharing settings for Microsoft Forms as well capturing the names of internal organization users who fill out forms.


Microsoft Graph Data Connect


Choose to enable Microsoft Graph Data Connect for the bulk transfer of data to Azure.


Microsoft Planner


Choose whether Planner users can publish to Outlook or iCal.


Microsoft Search on the Bing homepage


Customize the Bing.com search page for organization users.


Microsoft Teams


Choose whether to enable Teams organization-wide (users who are licensed will be blocked from using Teams). Also, choose coarse control for whether guest access is allowed in Teams.


Microsoft To Do


Choose to allow internal users the ability to join and contribute to external task lists and receive push notifications.


Microsoft Viva Insights (formerly MyAnalytics)


Manage which Viva Insights settings users have access to. By default, all options are selected (Viva Insights web experience, Digest email, Insights Outlook add-in and inline suggestions, and Schedule send suggestions).


Microsoft 365 Groups


Configure guest access and ownership settings for Microsoft 365 Groups.


Modern authentication


Provides links to information on configuring modern authentication and viewing basic authentication sign-in reports.


Multi-factor authentication


Provides links to information on configuring and learning about multi-factor authentication.


News


Choose organization and industry settings used to display relevant news information on the Bing home page as well as settings for delivering Microsoft-generated industry news to your organization users.


Office installation options


Choose the update channel for Microsoft 365 apps.


Office on the web


Choose whether to allow users to connect to third-party cloud storage products using Office on the web products.


Office Scripts


Configure Office Scripts settings for Excel on the web.


Reports


Choose how to display users’ personally identifiable information in internal reports and whether to make data available to Microsoft 365 usage analytics.


Search and intelligence usage analytics


Choose whether to allow usage analytics data to be filtered by country, occupation, department, or division.


SharePoint


Choose whether to enable external sharing.


Sway


Choose whether to allow the sharing of Sways outside the organization as well as what content sources are available (Flickr, Pickit, Wikipedia, and YouTube).


User consent to apps


Choose whether users can provide consent to OAuth 2 apps that access organization data.


User-owned apps and services


Choose whether to allow users to auto-claim licenses as well as start trials and access the Office Store.


Viva Learning


Choose which content provider data sources to use for Viva Learning. By default, LinkedIn Learning, Microsoft Learn, Microsoft 365 Training, and Custom Uploads are enabled. You can also manage the level of diagnostic data sent to Microsoft.


What’s new in Office


Choose whether to display messages to users about new features that are available. This does not change the availability of the feature—only the display of the notification message.


Whiteboard


Choose whether to allow the Whiteboard app to be used. Additionally, manage the amount of diagnostic data collected.

Table 1.2 – Organizational service settings

Auto-labeling policies – Implementing Microsoft Purview Information Protection and Data Lifecycle Management

The auto-labeling policies, like other content automation policies in Microsoft Purview, use detection algorithms and processes (such as sensitive information types and trainable classifiers) to apply labels to content in the M365 environment. These are service-side labeling features. After you’ve laid out a labeling scheme consisting of labels and sublabels and decided how content should be classified, you can use and customize the templates in the auto-labeling wizard to apply labels to content matching your classifiers.

Suppose, for example, you need to identify and classify documents that have sensitive information, such as U.S. taxpayer identification numbers or social security numbers, and have created a label called Highly Confidential. You can use an auto-labeling policy with one of the predefined templates to detect taxpayer and social security number patterns and then apply a label to those matching documents.

To create an auto-labeling policy, follow these steps:

  1. In the Microsoft Purview compliance portal (https://compliance.microsoft.com), expand Information protection and select Auto-labeling.
  2. Click Create auto-labeling policy, as shown in Figure 10.51.

Figure 10.51 – Selecting Create auto-labeling policy

  1. On the Info to label page, select the template that you want to use to detect sensitive data. You can choose from a variety of sensitive information types including financial, medical, and privacy continuum. You can select Custom to create a policy based on your own criteria and sensitive information types. In this example, the U.S. State Breach Notification Laws Enhanced template has been selected, which includes detections for a number of personal data elements including financial information, taxpayer data, government identification (such as passports and driver’s licenses), and medical terminology.

Figure 10.52 – Selecting a category template

  1. Click Next.
  2. Enter a Name value for the policy and click Next.
  3. On the Admin units page, choose which administrative units to use for scoping the policy. By default, the entire tenant is selected. Click Next.
  4. On the Locations page, choose where you want this policy to apply labels. By default, all Exchange email, SharePoint sites, and OneDrive accounts are selected as part of the application scope. Click Next.
  5. On the Policy rules page, you can select either Common rules or Advanced rules. Both Common rules and Advanced rules start off with a base template that you can customize, though Advanced rules gives you more customization ability when it comes to email conditions. Select a rules option and click Next.

Figure 10.53 – Selecting policy rules

  1. Review the rules that are in place, customize if desired, and click Next to continue.
  2. On the Label page, select which label you want to apply to the detected content. Click Next.

Figure 10.54 – Selecting the label to apply

  1. If you have Exchange email selected as a location on the Locations page, you have an Automatically replace existing labels that have the same or lower priority option. Additionally, if the label you selected has encryption settings, you can choose Apply encryption to email received from outside of the organization if required. If you do not choose Assign a Rights Management owner, encryption will not be applied to received emails.

Figure 10.55 – Specifying additional settings for email

  1. Click Next.
  2. On the Policy mode page, select how the policy will be implemented. There is no setting to turn the policy on immediately, though you can choose Run the policy in simulation mode and then select the Automatically turn on policy if not modified after 7 days in simulation option. You can also choose Leave policy turned off if you’re not ready to move forward with it just yet.

Figure 10.56 – Choosing the policy mode

  1. Click Next.
  2. On the Finish page, review the settings and adjust if necessary. Click Create policy.

A labeling policy (whether a standard label policy or an auto-label policy) can only apply a single label to content. Additionally, an item may only have one sensitivity label applied to it at a time. If you have multiple labels and sublabels and want to automatically apply multiple labels, you’ll need to create a separate policy for each label that you want to apply. Labels also have a concept of priority— where a higher number means it has a higher priority. If a labeling policy identifies content that could potentially match two labels with different priorities, M365 will apply the label with the higher priority to the content.

Exam tip
The core takeaway from the two types of labeling policies is that label policies are generally focused on interactive activities (such as navigating a browser interface to apply a label or applying a label while creating and editing a document) while auto-labeling policies generally apply to content at rest.

Managing DNS records manually – Planning and Implementing a Microsoft 365 Tenant

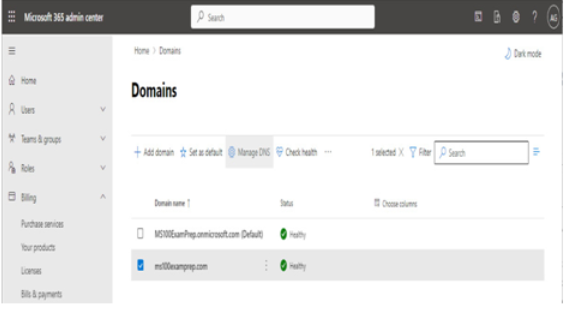
If you’ve opted to manage DNS records manually, you may need to go back to the Microsoft 365 admin center and view the settings. To do this, you can navigate to the Domains page in the Microsoft 365 admin center, select your domain, and then select Manage DNS:

Figure 1.12 – Managing DNS settings for a domain

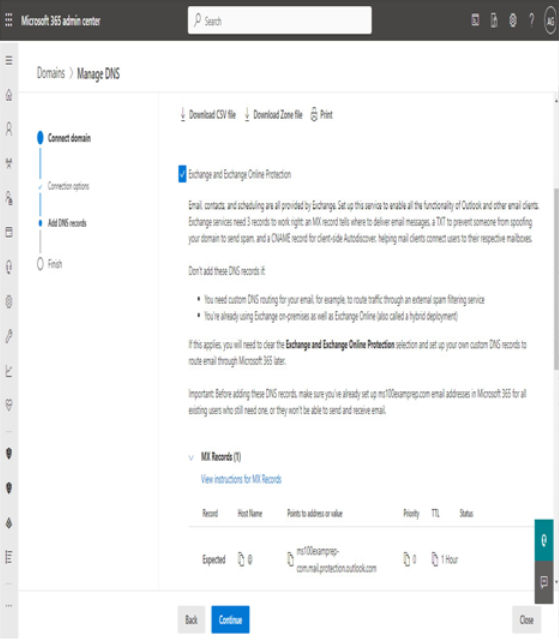
On the Connect domain page, click More options to expand the options, and then select Add your own DNS records. From here, you can view the specific DNS settings necessary per service by record type. You can also download a CSV file or a zone file that can be uploaded to your own DNS server.

Figure 1.13 – Viewing DNS settings

The CSV output is formatted as columns, while the zone file output is formatted for use with standard DNS services and can be imported or appended to BIND or Microsoft DNS server zone files.

Configuring a default domain

After adding a domain, Microsoft 365 automatically sets that first custom domain as the default domain, which will get used when creating new users. However, if you have additional domains, you may choose to select a different domain to be used as the default domain when creating objects.

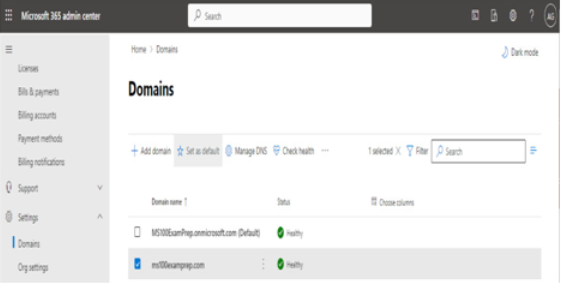
To manage which domain will be set as your primary domain, select the domain from the Domains page and then click Set as default to update the setting:

Figure 1.14 – Setting the default domain

The default domain will be selected automatically when creating cloud-based users and groups.

Custom domains and synchronization

When creating new cloud-based objects, you can select from any of the domains available in your tenant. However, when synchronizing from an on-premises directory, objects will be configured with the same domain configured with the on-premises object. If the corresponding domain hasn’t been verified in the tenant, synchronized objects will be set to use the tenant-managed domain.

Next, we’ll look at core organizational settings in a tenant.

Configuring organizational settings

Organizational settings, as the name implies, are configuration options that apply to the entire tenant. They are used to enable or disable features at the service or tenant level. In many instances, organizational settings are coarse controls that can be further refined by configuration settings inside each individual service.

To access the organizational settings, follow these steps:

  1. Navigate to the Microsoft 365 admin center (https://admin.microsoft.com).
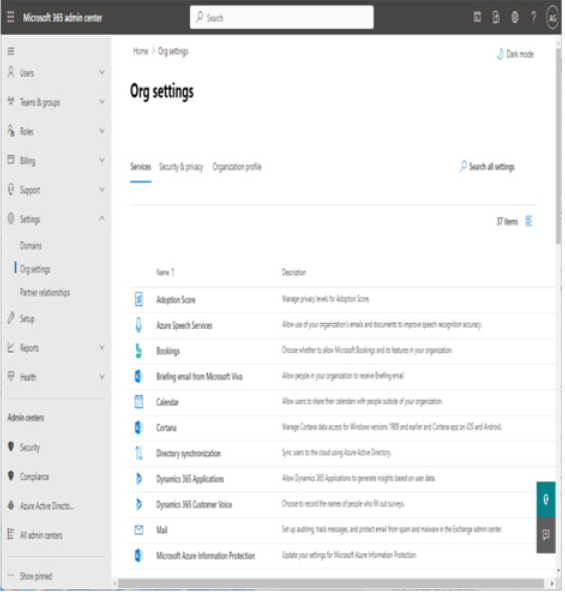
  2. In the navigation pane, expand Settings and select Org settings.

Figure 1.15 – Org settings in the Microsoft 365 admin center

The Org settings page has three tabs:

  • Services
  • Security & privacy
  • Organizational profile

In the next section, we’ll look at the settings available in each of them.

ABOUT ICANN – Planning and Implementing a Microsoft 365 Tenant-2

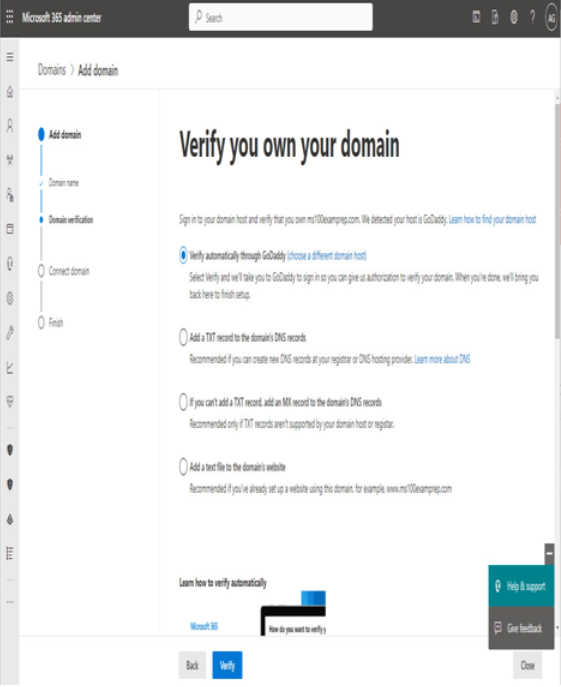
  1. If your domain is registered at a host that supports Domain Connect, you can provide your credentials to the Microsoft 365 Add domain wizard and click Verify. Microsoft will automatically configure the necessary domain records and complete the entire DNS setup for you. You can also select More options to see all of the potential verification methods available, as shown in Figure 1.7:

Figure 1.7 – Verify domain ownership

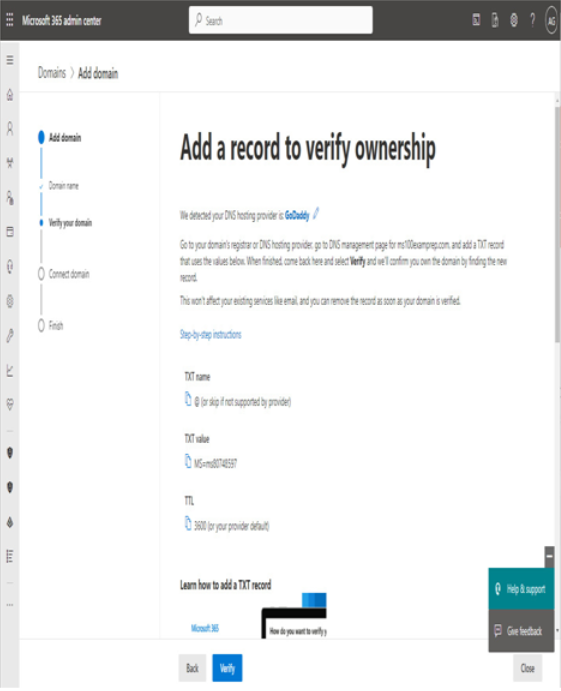
  1. If you choose any of the additional verification options (such as Add a TXT record to the domain’s DNS records), you’ll need to manually add DNS records with your DNS service provider. Microsoft provides the value configuration parameters necessary for you to configure DNS with your own service provider. After entering the values with your service provider, you can come back to the wizard and select Verify, as shown in Figure 1.8:

Figure 1.8 – Completing verification records manually

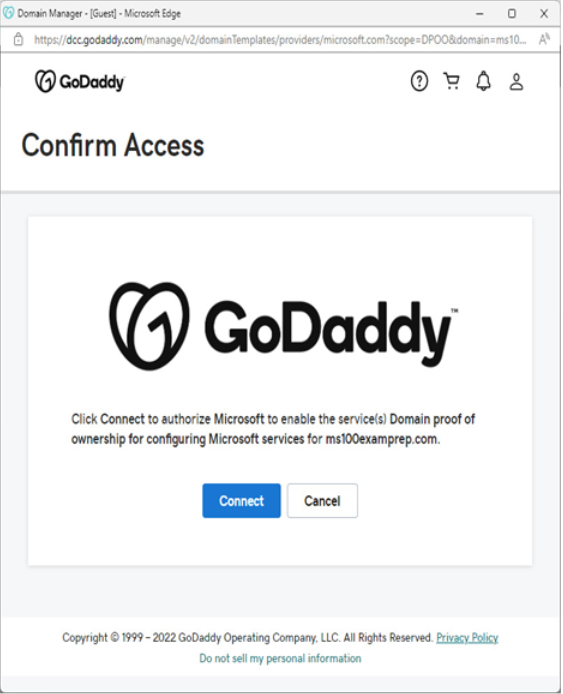
  1. If you’re using Domain Connect, enter the credentials for your registrar. When ready, click Connect.

Figure 1.9 – Authorizing Domain Connect to update DNS records

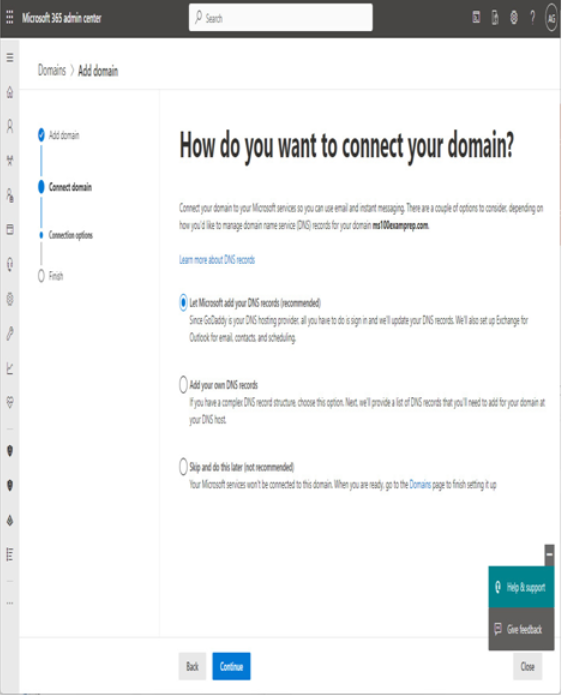
  1. Select Let Microsoft Add your DNS records (recommended) to have the Microsoft 365 wizard update your organization’s DNS records at the registrar. However, if you are going to be configuring advanced scenarios such as Exchange Hybrid for mail coexistence and migration or have other complex requirements, you may want to consider managing the DNS records manually or opting out of select services. Click Continue.

Figure 1.10 – Connecting domain to Microsoft 365

  1. Choose whether to allow Microsoft to add DNS records. Expand the Advanced options drop-down:
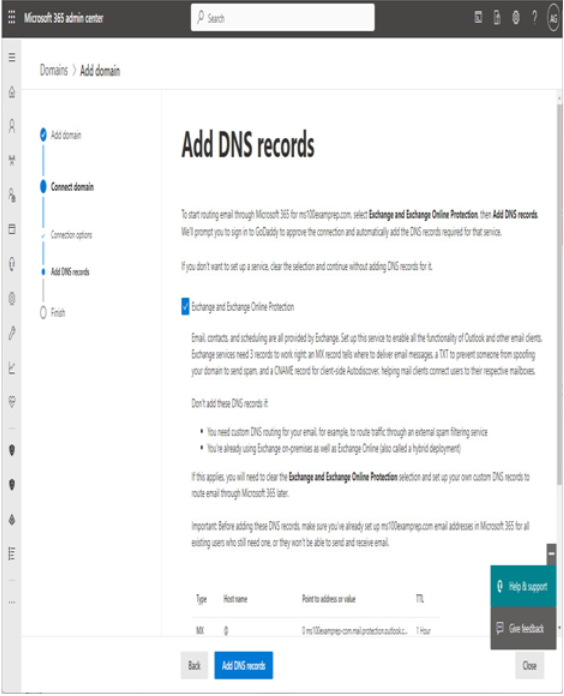
  2. The first checkbox, Exchange and Exchange Online Protection, manages DNS settings for Outlook and email delivery. If you have an existing Exchange Server deployment on-premises (or another mail service solution), you should clear this checkbox before continuing. You’ll need to come back to configure DNS settings to establish hybrid connectivity correctly. The default selected option means that Microsoft will make the following updates to your organization’s DNS:
  3. Your organization’s MX record will be updated to point to Exchange Online Protection.
  4. The Exchange Autodiscover record will be updated to point to autodiscover.outlook.com.
  5. Microsoft will update your organization’s SPF record with v=spf1 include:spf.protection.outlook.com -all.

Figure 1.11 – Adding DNS records

  1. The second setting, Skype for Business, will configure DNS settings for Skype for Business. If you have an existing Skype for Business Online deployment or you’re using Skype for Business on-premises, you may need to clear this box until you verify your configuration:
  2. Microsoft will add two SRV records: _sip._tls.@ and _sipfederationtls._tcp@.
  3. Microsoft will also add two CNAMEs for Lync: sip. to point to sipdir.online.lync.com and lyncdiscover. to point to webdir.online.lync.com.
  4. The third checkbox, Intune and Mobile Device Management for Microsoft 365, configures applicable DNS settings for device registration. It is recommended to leave this enabled:
  5. Microsoft will add the following CNAME entries to support mobile device registration and management: enterpriseenrollment. to enterpriseenrollment.manage.microsoft.com and enterpriseregistration. to enterpriseregistration.windows.net.
  6. Click Add DNS records.
  7. If prompted, click Connect to authorize Microsoft to update your registrar’s DNS settings.
  8. Click Done to exit the wizard or View all domains to go back to the Domains page if you need to add more domains.

You can continue adding as many domains as you need (up to the tenant maximum of 900 domains).
ADDING A DOMAIN DEEP DIVE
To review alternative steps and more information about the domain addition process, see https://learn.microsoft.com/en-us/microsoft-365/admin/setup/add-domain.

ABOUT ICANN – Planning and Implementing a Microsoft 365 Tenant-1

ICANN (short for Internet Corporation for Assigned Names and Numbers) is a non-profit organization tasked with providing guidance and policy around the internet’s unique identifiers (domains). It was chartered in 1998. Prior to 1998, Network Solutions operated the global domain name system registry under a subcontract from the United States Defense Information Systems Agency.

You can search the list of domain registrars here: https://www.icann.org/en/accredited-registrars.

Microsoft

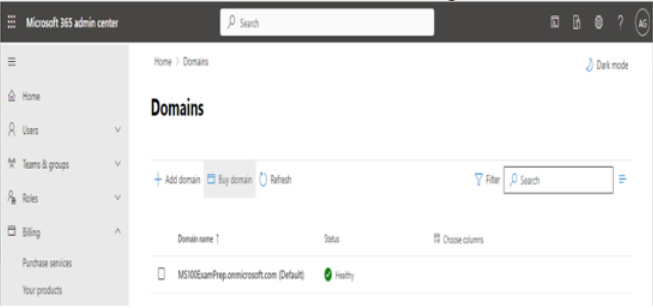
In addition to choosing a third-party registrar, organizations may also wish to use Microsoft as the registrar. Depending on your subscription, you may have direct access to purchasing domain names from within the Microsoft 365 admin center, as shown in Figure 1.4:

Figure 1.4 – Purchasing a domain through the Microsoft 365 admin center

When purchasing a domain through Microsoft, you can select from the following top-level domains:

  • .biz
  • .com
  • .info
  • .me
  • .mobi
  • .net
  • .org
  • .tv
  • .co.uk
  • .org.uk

Domain purchases will be billed separately from your Microsoft 365 subscription services. When purchasing a domain from Microsoft, you’ll have limited ability to manage Domain Name System (DNS) records. If you require custom configuration (such as configuring an MX record to point to a non-Microsoft 365 server), you’ll need to purchase a domain separately.

Configuring a domain name

Configuring a domain for your tenant is a simple procedure and requires access to your organization’s public DNS service provider. Many large organizations may host DNS themselves, while other organizations choose to pay service providers (such as the domain registrar) to host the services.

In order to be compatible with Microsoft 365, a DNS service must support configuring the following types of records:

  • CNAME: Canonical Name records are alias records for a domain, allowing a name to point to another name as a reference. For example, let’s say you have a website named www.contoso.com that resolves to an IP address of 1.2.3.4. Later, you want to start building websites for na.contoso.com and eu.contoso.com on the same web server. You might implement a CNAME record for na.contoso.com to point to www.contoso.com.
  • TXT: A Text Record is a DNS record used to store somewhat unstructured information. Request for Comments (RFC) 1035 (https://tools.ietf.org/html/rfc1035) specifies that the value must be a text string and gives no specific format for the value data. Over the years, Sender Policy Framework (SPF), DomainKeys Identified Mail (DKIM), and other authentication and verification data have been published as TXT records. In addition to SPF and DKIM, the Microsoft 365 domain addition process requires the administrator to place a certain value in a TXT record to confirm ownership of the domain.
  • SRV: A Service Locator record is used to specify a combination of a host in addition to a port for a particular internet protocol or service.
  • MX: The Mail Exchanger record is used to identify which hosts (servers or other devices) are responsible for handling mail for a domain.

In order to use a custom domain (sometimes referred to as a vanity domain) with Microsoft 365, you’ll need to add it to your tenant.

To add a custom domain, follow these steps:

  1. Navigate to the Microsoft 365 admin center (https://admin.microsoft.com) and log in.
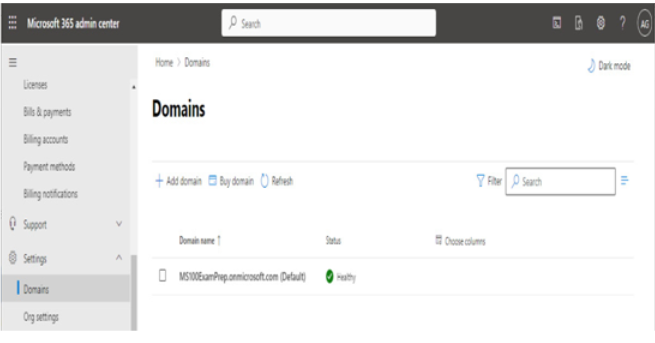
  2. Expand Settings and select Domains.

Figure 1.5 – Domains page of the Microsoft 365 admin center

3. Click Add domain.

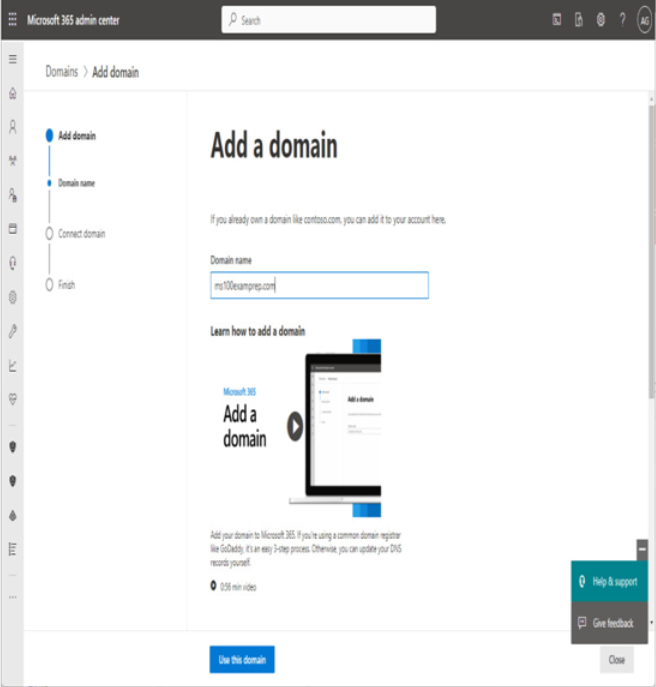
4. On the Add a domain page, enter the custom domain name you wish to add to your Microsoft 365 tenant. Select Use this domain to continue.

Figure 1.6 – Add a domain page

Summary – Implementing Microsoft Purview Information Protection and Data Lifecycle Management

In this chapter, you learned about some of the important compliance tasks that many organizations face, such as content classification and retention. You learned about the foundational technical concepts around sensitive information types. SITs are used to classify content and can be used in the Microsoft Purview solutions including labeling and retention.

In the next chapter, you’ll apply the SIT knowledge learned here to another compliance concept: data loss prevention.

Exam Readiness Drill – Chapter Review Questions
Benchmark Score: 75%
Apart from a solid understanding of key concepts, being able to think quickly under time pressure is a skill that will help you ace your certification exam. That’s why, working on these skills early on in your learning journey is key.

Chapter review questions are designed to improve your test-taking skills progressively with each chapter you learn and review your understanding of key concepts in the chapter at the same time. You’ll find these at the end of each chapter.

Before You Proceed
You need to unlock these resources before you start using them. Unlocking takes less than 10 minutes, can be done from any device, and needs to be done only once. Head over to the start of Chapter 7, Managing Security Reports and Alerts by Using the Microsoft 365 Defender Portal in this book for instructions on how to unlock them.

To open the Chapter Review Questions for this chapter, click the following link:
https://packt.link/MS102E1_CH10. Or, you can scan the following QR code:

Figure 10.57 – QR code that opens Chapter Review Questions for logged-in users

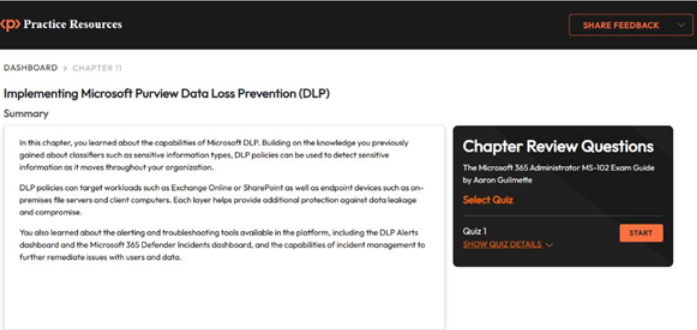
Once you login, you’ll see a page similar to what is shown in Figure 10.58:

Figure 10.58 – Chapter Review Questions for Chapter 10

Once ready, start the following practice drills, re-attempting the quiz multiple times:

Exam Readiness Drill

For the first 3 attempts, don’t worry about the time limit.

ATTEMPT 1
The first time, aim for at least 40%. Look at the answers you got wrong and read the relevant sections in the chapter again to fix your learning gaps.

ATTEMPT 2
The second time, aim for at least 60%. Look at the answers you got wrong and read the relevant sections in the chapter again to fix any remaining learning gaps.

ATTEMPT 3
The third time, aim for at least 75%. Once you score 75% or more, you start working on your timing.

Tip
You may take more than 3 attempts to reach 75%. That’s okay. Just review the relevant sections in the chapter till you get there.

Working On Timing
Target: Your aim is to keep the score the same while trying to answer these questions as quickly as possible. Here’s an example of how your next attempts should look like:

Table 10.2 – Sample timing practice drills on the online platform

Note
The time limits shown in the above table are just examples. Set your own time limits with each attempt based on the time limit of the quiz on the website.

With each new attempt, your score should stay above 75% while your time taken to complete should decrease. Repeat as many attempts as you want till you feel confident dealing with the time pressure.

Reviewing and Responding to DLP Alerts – Implementing Microsoft Purview data loss prevention (DLP)

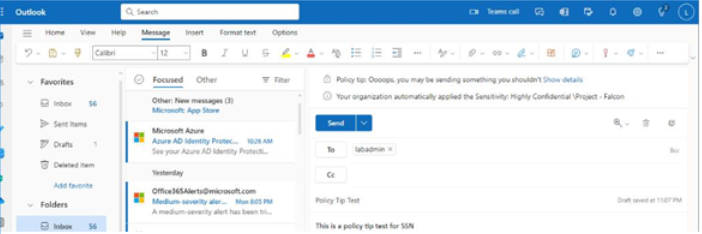
In Chapter 10, Implementing Microsoft Purview Information Protection and Data Lifecycle Management, and so far in this chapter, you’ve learned how Microsoft’s information protection and DLP features can be used to detect sensitive information in your organization and then both classify and protect it. For example, when sending sensitive information through email, a DLP policy applied to Exchange Online can be used to cause Outlook to display a policy tip, as shown in Figure 11.25:

Figure 11.25 – Policy tip test

What happens, though, when users ignore the policy tip warning and send sensitive data anyway? That’s dependent on your DLP policy alerting settings.

Organizations with any subscription can create DLP alerts that are triggered on every matching activity. Organizations with A5, E5, or G5 subscriptions or an Office 365 Advanced Threat Protection Plan 2, Microsoft 365 E5 Compliance, or Microsoft 365 eDiscovery and Audit add-on license can configure aggregated alerts—meaning that DLP alerts will only show up based on a certain threshold.

DLP alerts show up in three places:

  • Microsoft Purview compliance portal| Data loss prevention | Alerts: Only DLP-related events and alerts
  • Microsoft Purview compliance portal| Alerts: All events and alerts in the compliance portal, including DLP alerts

•    Microsoft 365 Defender portal| Incidents & alerts | Alerts: All security-related events and alerts, including DLP alerts

In addition to those alert views, the event data is also surfaced in the following ways:

  • Microsoft Purview compliance portal| Data loss prevention | Activity explorer: All compliance activity, including DLP policy activity
  • Microsoft Purview compliance portal| Data classification | Activity explorer: All compliance activity, including DLP policy activity
  • Microsoft 365  Defender portal| Incidents & alerts | Incidents: DLP alerts as exfiltration incidents
  • Microsoft Purview compliance portal| Audit log: All activity and events in Microsoft 365, including DLP policy activity

In this last section of the book, you’ll look at activities you can perform in these areas to both review and respond to DLP events.

Summary – Implementing Microsoft Purview data loss prevention (DLP)

In this chapter, you learned about the capabilities of Microsoft DLP. Building on the knowledge you previously gained about classifiers such as sensitive information types, DLP policies can be used to detect sensitive information as it moves throughout your organization.

DLP policies can target workloads such as Exchange Online or SharePoint as well as endpoint devices such as on-premises file servers and client computers. Each layer helps provide additional protection against data leakage and compromise.

You also learned about the alerting and troubleshooting tools available in the platform, including the DLP Alerts dashboard and the Microsoft 365 DefenderIncidents dashboard, and the capabilities of incident management to further remediate issues with users and data.

Exam Readiness Drill – Chapter Review Questions

Benchmark Score: 75%

Apart from a solid understanding of key concepts, being able to think quickly under time pressure is a skill that will help you ace your certification exam. That’s why, working on these skills early on in your learning journey is key.

Chapter review questions are designed to improve your test-taking skills progressively with each chapter you learn and review your understanding of key concepts in the chapter at the same time. You’ll find these at the end of each chapter.

Before You Proceed

You need to unlock these resources before you start using them. Unlocking takes less than 10 minutes, can be done from any device, and needs to be done only once. Head over to thestart of Chapter 7, Managing Security Reports and Alerts by Using the Microsoft 365 Defender Portal in this book for instructions on how to unlock them.

To open the Chapter Review Questions for this chapter, click the following link:

https://packt.link/MS102E1_CH11. Or, you can scan the following QR code:

Figure 11.40 – QR code that opens Chapter Review Questions for logged-in users Once you login, you’ll see a page similar to what is shown in Figure 11.41:

Figure 11.41 – Chapter Review Questions for Chapter 11

Once ready, start the following practice drills, re-attempting the quiz multiple times:

Exam Readiness Drill

For the first 3 attempts, don’t worry about the time limit.

ATTEMPT 1

The first time, aim for at least 40%. Look at the answers you got wrong and read the relevant sections in the chapter again to fix your learning gaps.

ATTEMPT 2

The second time, aim for at least 60%. Look at the answers you got wrong and read the relevant sections in the chapter again to fix any remaining learning gaps.

ATTEMPT 3

The third time, aim for at least 75%. Once you score 75% or more, you start working on your timing.

Tip You may take more than 3 attempts to reach 75%. That’s okay. Just review the relevant sections in the chapter till you get there.

Working On Timing

Target: Your aim is to keep the score the same while trying to answer these questions as quickly as possible. Here’s an example of how your next attempts should look like:

Table 11.1 – Sample timing practice drills on the online platform

Note The time limits shown in the above table are just examples. Set your own time limits with each attempt based on the time limit of the quiz on the website.

With each new attempt, your score should stay above 75% while your time taken to complete should decrease. Repeat as many attempts as you want till you feel confident dealing with the time pressure.

On-Premises File Servers – Implementing Microsoft Purview data loss prevention (DLP)

Despite the high rate of adoption for cloud services and infrastructure, many organizations still have

a lot of data stored in on-premises repositories such as SharePoint Server or Windows-based file servers. While cloud-based solutions are great for content stored in the cloud, what options are there for applying those same protections to data that hasn’t been migrated?

The answer is easy: Microsoft Purview Data Loss Prevention!

AIP Scanner
Originally branded as the Azure Information Protection scanner in 2018 to help identify sensitive information on-premises, the software has continuously been upgraded with more features. The newest iteration can help support your information protection goals.

Protecting on-premises repositories requires the following tasks to be completed:

• Configuring service accounts
• Deploying the AIP Unified Labeling (UL) client to an on-premises server
• Configuring the scanner settings
• Creating content scan jobs
• Creating an Azure app registration
• Deploying the AIP scanner to an on-premises server
• Configuring a DLP policy that includes on-premises repositories

As you can see, there are several pieces involved. Figure 11.9 shows the components in the on-premises DLP deployment:

Figure 11.9 – On-premises DLP architecture

The DLP architecture utilizes one or more on -premises servers configured with the AIP UL client and the AIP scanner. These servers query the DLP policies from the Microsoft Purview compliance portal, store service information in an on -premises SQL database, and are used to discover content in on-premises file shares and SharePoint sites.

Note
For production deployments, Microsoft recommends using a full version of SQL Server. For lab environments, you can use SQL Express. To download SQL Express, see https://www. microsoft.com/en-us/Download/details.aspx?id=101064.

Configuring a Service Account
For the scanner deployment, you’ll need two accounts—an on-premises account that has access to the file shares and SharePoint document libraries containing content to protect, and either a synchronized or cloud identity that will be used to access the Microsoft 365 service. They can be the same account (this may even make it easier from a deployment perspective). The AIP service does not currently support using a Managed Service Account (MSA) or group Managed Service Account (gMSA).

Deploying the AIP UL client
The first step in deploying the Microsoft Purview compliance solution on-premises is to ensure the server(s) you’ll be using have the most recent AIP UL client. Follow these steps to deploy the client:

  1. On the server(s) where you will configure the Microsoft Purview Information Protection Scanner cluster, navigate to https://aka.ms/aipclient to download the client. Either the .msi or .exe download is suitable.
  2. Once it has downloaded, launch the installer.
  3. Select I agree to proceed with the installation. Setup begins, as shown in Figure 11.10.

Figure 11.10 – AIP UL client installation

  1. Click Close to exit the installer.

Next, it’s time to move on to the scanner cluster installation.