Microsoft 365 usage reports – Monitoring Microsoft 365 Tenant Health

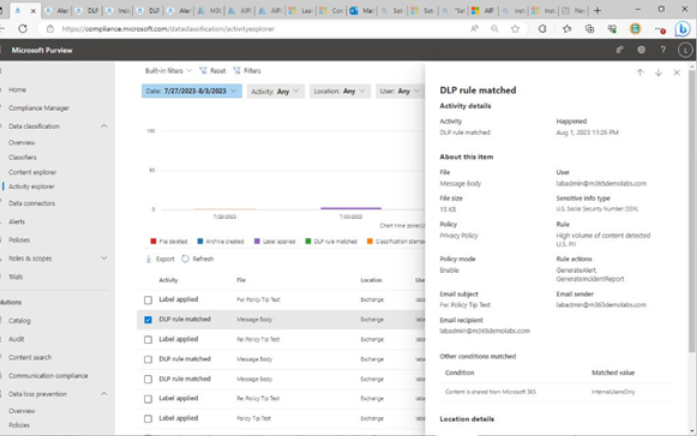
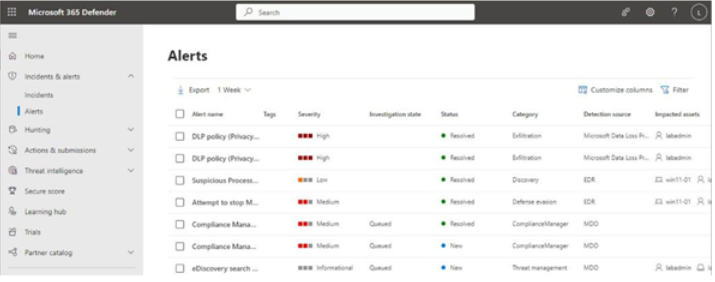
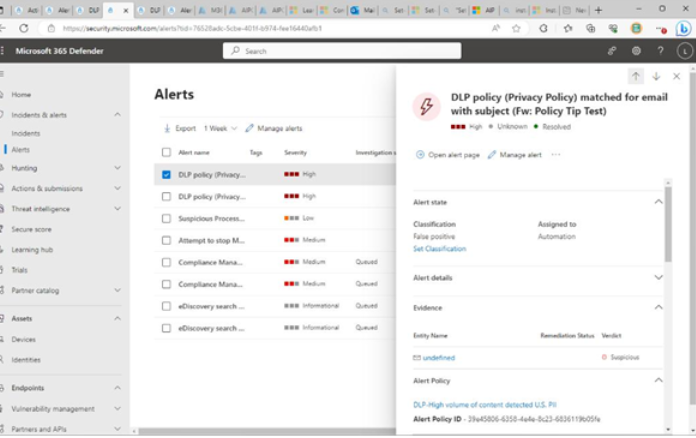
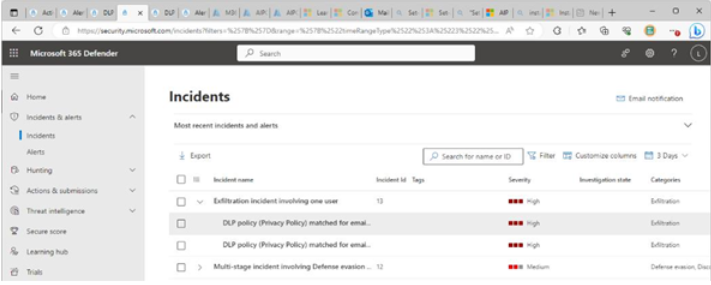
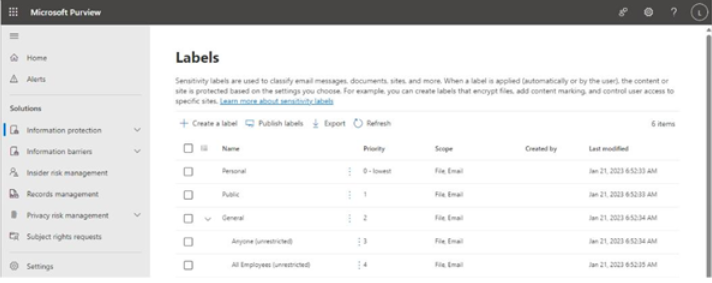
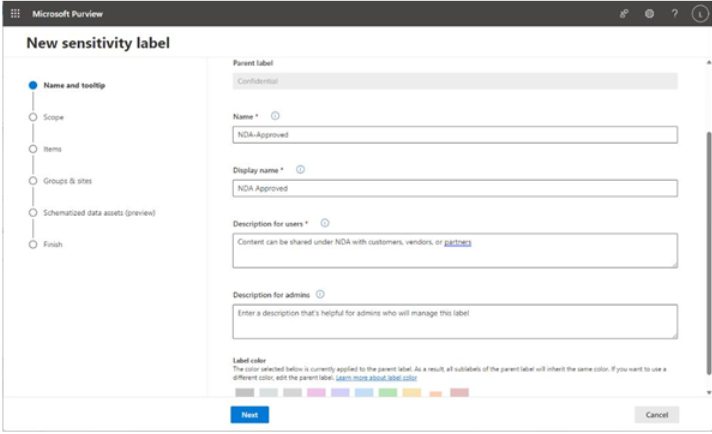
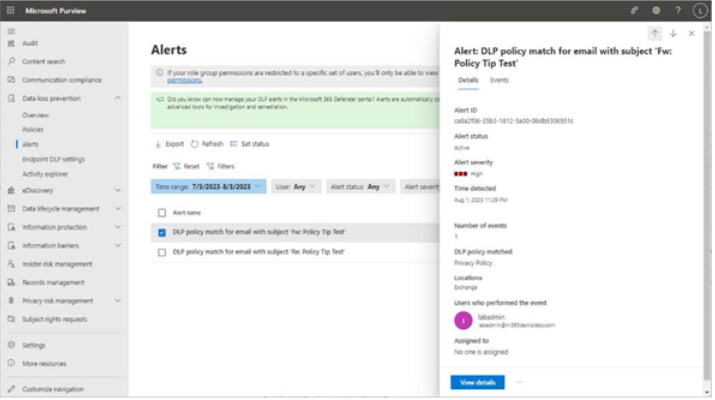
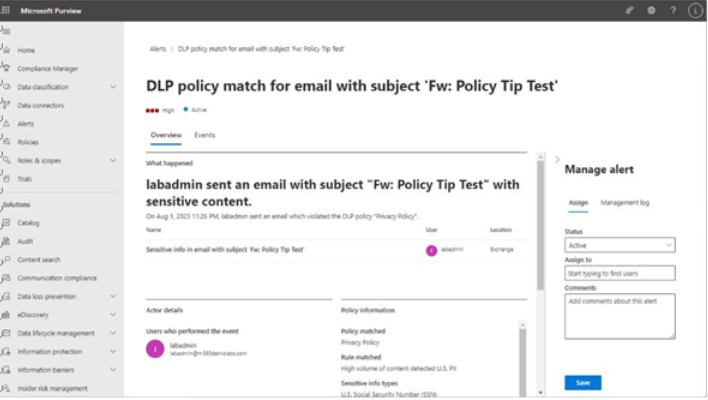
The Microsoft 365 usage reports are available inside the Microsoft 365 admin center. They are broad reports that can be used to get a high-level snapshot of how your organization uses the Microsoft 365 platform. Report data includes statistics about how many files are stored in SharePoint, how many Exchange mailboxes were active during the reporting period, as well as engagement with other products such as Yammer or Forms:

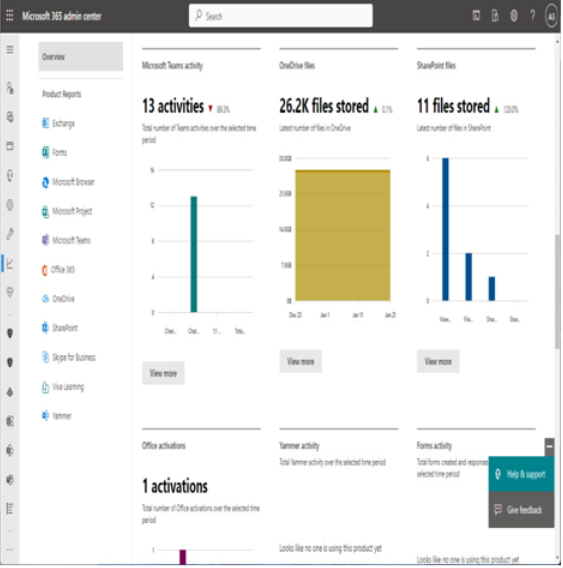
Figure 2.21 – Microsoft 365 usage reports

Usage reports can be accessed by navigating to the Microsoft 365 admin center (https://admin.microsoft.com), expanding Reports, and selecting Usage.

Viva Insights

Formerly known as Workplace Analytics, Viva Insights provides recommendations about personal and teamwork habits. Viva Insights has four core areas:

  • Personal insights
  • Teamwork habits
  • Organization trends
  • Advanced insights

Each of these areas has unique features that are part of the Viva story.

Personal insights

As the name suggests, personal insights are tailored to an individual. Personal insights are private and are only visible to the individual for whom they are intended. Personal insights are best viewed using the Viva Insights app in Microsoft Teams, as shown in Figure 2.22:

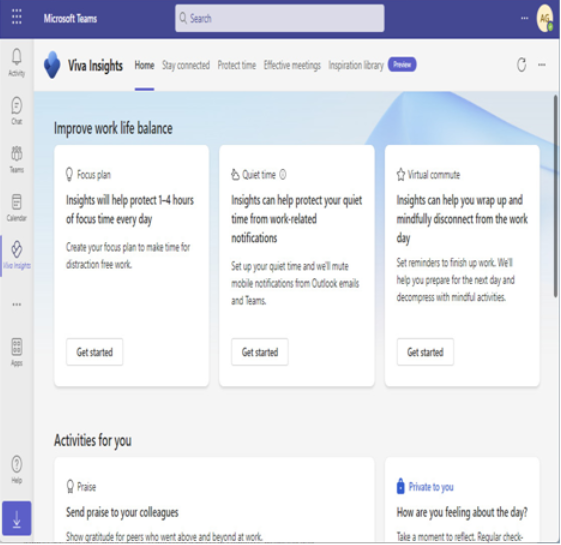
Figure 2.22 – Viva Insights app in Microsoft Teams

The Viva Insights app has functions to allow you to make a focus plan (sometimes referred to as the protect time feature), send praise to your colleagues either publicly or privately, and stay connected through AI-based task suggestions and meeting assistance.

The Viva Insights app also features Headspace guided meditation and mindfulness exercises, as well as prompts for taking a break and reflecting on your personal feelings. Using the Reflection activity card, you can even set daily reminders to check in on yourself:

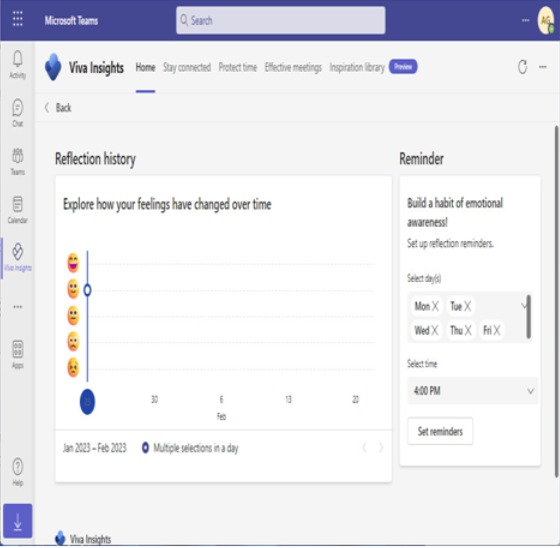
Figure 2.23 – Reflection activity card

Viva Insights also has a daily ramp-up and wind-down micro-app called Virtual commute, which lets users review upcoming meetings and tasks, block focus time, and initiate a variety of mini-break, meditative, and reflective activities. See Figure 2.23:

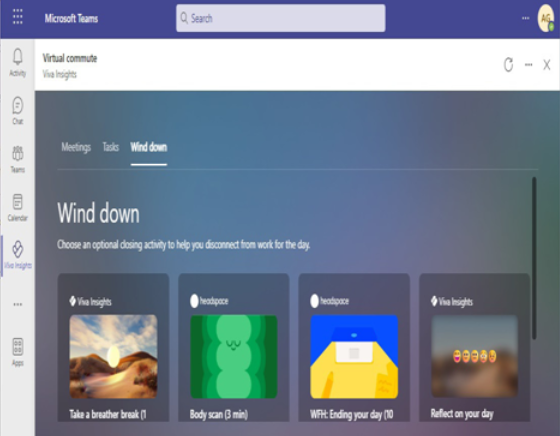
Figure 2.24 – Virtual commute activity card

Together, these insights features can help users manage both their productivity and personal well-being.

Auto-labeling policies – Implementing Microsoft Purview Information Protection and Data Lifecycle Management

The auto-labeling policies, like other content automation policies in Microsoft Purview, use detection algorithms and processes (such as sensitive information types and trainable classifiers) to apply labels to content in the M365 environment. These are service-side labeling features. After you’ve laid out a labeling scheme consisting of labels and sublabels and decided how content should be classified, you can use and customize the templates in the auto-labeling wizard to apply labels to content matching your classifiers.

Suppose, for example, you need to identify and classify documents that have sensitive information, such as U.S. taxpayer identification numbers or social security numbers, and have created a label called Highly Confidential. You can use an auto-labeling policy with one of the predefined templates to detect taxpayer and social security number patterns and then apply a label to those matching documents.

To create an auto-labeling policy, follow these steps:

  1. In the Microsoft Purview compliance portal (https://compliance.microsoft.com), expand Information protection and select Auto-labeling.
  2. Click Create auto-labeling policy, as shown in Figure 10.51.

Figure 10.51 – Selecting Create auto-labeling policy

  1. On the Info to label page, select the template that you want to use to detect sensitive data. You can choose from a variety of sensitive information types including financial, medical, and privacy continuum. You can select Custom to create a policy based on your own criteria and sensitive information types. In this example, the U.S. State Breach Notification Laws Enhanced template has been selected, which includes detections for a number of personal data elements including financial information, taxpayer data, government identification (such as passports and driver’s licenses), and medical terminology.

Figure 10.52 – Selecting a category template

  1. Click Next.
  2. Enter a Name value for the policy and click Next.
  3. On the Admin units page, choose which administrative units to use for scoping the policy. By default, the entire tenant is selected. Click Next.
  4. On the Locations page, choose where you want this policy to apply labels. By default, all Exchange email, SharePoint sites, and OneDrive accounts are selected as part of the application scope. Click Next.
  5. On the Policy rules page, you can select either Common rules or Advanced rules. Both Common rules and Advanced rules start off with a base template that you can customize, though Advanced rules gives you more customization ability when it comes to email conditions. Select a rules option and click Next.

Figure 10.53 – Selecting policy rules

  1. Review the rules that are in place, customize if desired, and click Next to continue.
  2. On the Label page, select which label you want to apply to the detected content. Click Next.

Figure 10.54 – Selecting the label to apply

  1. If you have Exchange email selected as a location on the Locations page, you have an Automatically replace existing labels that have the same or lower priority option. Additionally, if the label you selected has encryption settings, you can choose Apply encryption to email received from outside of the organization if required. If you do not choose Assign a Rights Management owner, encryption will not be applied to received emails.

Figure 10.55 – Specifying additional settings for email

  1. Click Next.
  2. On the Policy mode page, select how the policy will be implemented. There is no setting to turn the policy on immediately, though you can choose Run the policy in simulation mode and then select the Automatically turn on policy if not modified after 7 days in simulation option. You can also choose Leave policy turned off if you’re not ready to move forward with it just yet.

Figure 10.56 – Choosing the policy mode

  1. Click Next.
  2. On the Finish page, review the settings and adjust if necessary. Click Create policy.

A labeling policy (whether a standard label policy or an auto-label policy) can only apply a single label to content. Additionally, an item may only have one sensitivity label applied to it at a time. If you have multiple labels and sublabels and want to automatically apply multiple labels, you’ll need to create a separate policy for each label that you want to apply. Labels also have a concept of priority— where a higher number means it has a higher priority. If a labeling policy identifies content that could potentially match two labels with different priorities, M365 will apply the label with the higher priority to the content.

Exam tip
The core takeaway from the two types of labeling policies is that label policies are generally focused on interactive activities (such as navigating a browser interface to apply a label or applying a label while creating and editing a document) while auto-labeling policies generally apply to content at rest.

Summary – Implementing Microsoft Purview Information Protection and Data Lifecycle Management

In this chapter, you learned about some of the important compliance tasks that many organizations face, such as content classification and retention. You learned about the foundational technical concepts around sensitive information types. SITs are used to classify content and can be used in the Microsoft Purview solutions including labeling and retention.

In the next chapter, you’ll apply the SIT knowledge learned here to another compliance concept: data loss prevention.

Exam Readiness Drill – Chapter Review Questions
Benchmark Score: 75%
Apart from a solid understanding of key concepts, being able to think quickly under time pressure is a skill that will help you ace your certification exam. That’s why, working on these skills early on in your learning journey is key.

Chapter review questions are designed to improve your test-taking skills progressively with each chapter you learn and review your understanding of key concepts in the chapter at the same time. You’ll find these at the end of each chapter.

Before You Proceed
You need to unlock these resources before you start using them. Unlocking takes less than 10 minutes, can be done from any device, and needs to be done only once. Head over to the start of Chapter 7, Managing Security Reports and Alerts by Using the Microsoft 365 Defender Portal in this book for instructions on how to unlock them.

To open the Chapter Review Questions for this chapter, click the following link:
https://packt.link/MS102E1_CH10. Or, you can scan the following QR code:

Figure 10.57 – QR code that opens Chapter Review Questions for logged-in users

Once you login, you’ll see a page similar to what is shown in Figure 10.58:

Figure 10.58 – Chapter Review Questions for Chapter 10

Once ready, start the following practice drills, re-attempting the quiz multiple times:

Exam Readiness Drill

For the first 3 attempts, don’t worry about the time limit.

ATTEMPT 1
The first time, aim for at least 40%. Look at the answers you got wrong and read the relevant sections in the chapter again to fix your learning gaps.

ATTEMPT 2
The second time, aim for at least 60%. Look at the answers you got wrong and read the relevant sections in the chapter again to fix any remaining learning gaps.

ATTEMPT 3
The third time, aim for at least 75%. Once you score 75% or more, you start working on your timing.

Tip
You may take more than 3 attempts to reach 75%. That’s okay. Just review the relevant sections in the chapter till you get there.

Working On Timing
Target: Your aim is to keep the score the same while trying to answer these questions as quickly as possible. Here’s an example of how your next attempts should look like:

Table 10.2 – Sample timing practice drills on the online platform

Note
The time limits shown in the above table are just examples. Set your own time limits with each attempt based on the time limit of the quiz on the website.

With each new attempt, your score should stay above 75% while your time taken to complete should decrease. Repeat as many attempts as you want till you feel confident dealing with the time pressure.

Reviewing and Responding to DLP Alerts – Implementing Microsoft Purview data loss prevention (DLP)

In Chapter 10, Implementing Microsoft Purview Information Protection and Data Lifecycle Management, and so far in this chapter, you’ve learned how Microsoft’s information protection and DLP features can be used to detect sensitive information in your organization and then both classify and protect it. For example, when sending sensitive information through email, a DLP policy applied to Exchange Online can be used to cause Outlook to display a policy tip, as shown in Figure 11.25:

Figure 11.25 – Policy tip test

What happens, though, when users ignore the policy tip warning and send sensitive data anyway? That’s dependent on your DLP policy alerting settings.

Organizations with any subscription can create DLP alerts that are triggered on every matching activity. Organizations with A5, E5, or G5 subscriptions or an Office 365 Advanced Threat Protection Plan 2, Microsoft 365 E5 Compliance, or Microsoft 365 eDiscovery and Audit add-on license can configure aggregated alerts—meaning that DLP alerts will only show up based on a certain threshold.

DLP alerts show up in three places:

  • Microsoft Purview compliance portal| Data loss prevention | Alerts: Only DLP-related events and alerts
  • Microsoft Purview compliance portal| Alerts: All events and alerts in the compliance portal, including DLP alerts

•    Microsoft 365 Defender portal| Incidents & alerts | Alerts: All security-related events and alerts, including DLP alerts

In addition to those alert views, the event data is also surfaced in the following ways:

  • Microsoft Purview compliance portal| Data loss prevention | Activity explorer: All compliance activity, including DLP policy activity
  • Microsoft Purview compliance portal| Data classification | Activity explorer: All compliance activity, including DLP policy activity
  • Microsoft 365  Defender portal| Incidents & alerts | Incidents: DLP alerts as exfiltration incidents
  • Microsoft Purview compliance portal| Audit log: All activity and events in Microsoft 365, including DLP policy activity

In this last section of the book, you’ll look at activities you can perform in these areas to both review and respond to DLP events.

Summary – Implementing Microsoft Purview data loss prevention (DLP)

In this chapter, you learned about the capabilities of Microsoft DLP. Building on the knowledge you previously gained about classifiers such as sensitive information types, DLP policies can be used to detect sensitive information as it moves throughout your organization.

DLP policies can target workloads such as Exchange Online or SharePoint as well as endpoint devices such as on-premises file servers and client computers. Each layer helps provide additional protection against data leakage and compromise.

You also learned about the alerting and troubleshooting tools available in the platform, including the DLP Alerts dashboard and the Microsoft 365 DefenderIncidents dashboard, and the capabilities of incident management to further remediate issues with users and data.

Exam Readiness Drill – Chapter Review Questions

Benchmark Score: 75%

Apart from a solid understanding of key concepts, being able to think quickly under time pressure is a skill that will help you ace your certification exam. That’s why, working on these skills early on in your learning journey is key.

Chapter review questions are designed to improve your test-taking skills progressively with each chapter you learn and review your understanding of key concepts in the chapter at the same time. You’ll find these at the end of each chapter.

Before You Proceed

You need to unlock these resources before you start using them. Unlocking takes less than 10 minutes, can be done from any device, and needs to be done only once. Head over to thestart of Chapter 7, Managing Security Reports and Alerts by Using the Microsoft 365 Defender Portal in this book for instructions on how to unlock them.

To open the Chapter Review Questions for this chapter, click the following link:

https://packt.link/MS102E1_CH11. Or, you can scan the following QR code:

Figure 11.40 – QR code that opens Chapter Review Questions for logged-in users Once you login, you’ll see a page similar to what is shown in Figure 11.41:

Figure 11.41 – Chapter Review Questions for Chapter 11

Once ready, start the following practice drills, re-attempting the quiz multiple times:

Exam Readiness Drill

For the first 3 attempts, don’t worry about the time limit.

ATTEMPT 1

The first time, aim for at least 40%. Look at the answers you got wrong and read the relevant sections in the chapter again to fix your learning gaps.

ATTEMPT 2

The second time, aim for at least 60%. Look at the answers you got wrong and read the relevant sections in the chapter again to fix any remaining learning gaps.

ATTEMPT 3

The third time, aim for at least 75%. Once you score 75% or more, you start working on your timing.

Tip You may take more than 3 attempts to reach 75%. That’s okay. Just review the relevant sections in the chapter till you get there.

Working On Timing

Target: Your aim is to keep the score the same while trying to answer these questions as quickly as possible. Here’s an example of how your next attempts should look like:

Table 11.1 – Sample timing practice drills on the online platform

Note The time limits shown in the above table are just examples. Set your own time limits with each attempt based on the time limit of the quiz on the website.

With each new attempt, your score should stay above 75% while your time taken to complete should decrease. Repeat as many attempts as you want till you feel confident dealing with the time pressure.

On-Premises File Servers – Implementing Microsoft Purview data loss prevention (DLP)

Despite the high rate of adoption for cloud services and infrastructure, many organizations still have

a lot of data stored in on-premises repositories such as SharePoint Server or Windows-based file servers. While cloud-based solutions are great for content stored in the cloud, what options are there for applying those same protections to data that hasn’t been migrated?

The answer is easy: Microsoft Purview Data Loss Prevention!

AIP Scanner
Originally branded as the Azure Information Protection scanner in 2018 to help identify sensitive information on-premises, the software has continuously been upgraded with more features. The newest iteration can help support your information protection goals.

Protecting on-premises repositories requires the following tasks to be completed:

• Configuring service accounts
• Deploying the AIP Unified Labeling (UL) client to an on-premises server
• Configuring the scanner settings
• Creating content scan jobs
• Creating an Azure app registration
• Deploying the AIP scanner to an on-premises server
• Configuring a DLP policy that includes on-premises repositories

As you can see, there are several pieces involved. Figure 11.9 shows the components in the on-premises DLP deployment:

Figure 11.9 – On-premises DLP architecture

The DLP architecture utilizes one or more on -premises servers configured with the AIP UL client and the AIP scanner. These servers query the DLP policies from the Microsoft Purview compliance portal, store service information in an on -premises SQL database, and are used to discover content in on-premises file shares and SharePoint sites.

Note
For production deployments, Microsoft recommends using a full version of SQL Server. For lab environments, you can use SQL Express. To download SQL Express, see https://www. microsoft.com/en-us/Download/details.aspx?id=101064.

Configuring a Service Account
For the scanner deployment, you’ll need two accounts—an on-premises account that has access to the file shares and SharePoint document libraries containing content to protect, and either a synchronized or cloud identity that will be used to access the Microsoft 365 service. They can be the same account (this may even make it easier from a deployment perspective). The AIP service does not currently support using a Managed Service Account (MSA) or group Managed Service Account (gMSA).

Deploying the AIP UL client
The first step in deploying the Microsoft Purview compliance solution on-premises is to ensure the server(s) you’ll be using have the most recent AIP UL client. Follow these steps to deploy the client:

  1. On the server(s) where you will configure the Microsoft Purview Information Protection Scanner cluster, navigate to https://aka.ms/aipclient to download the client. Either the .msi or .exe download is suitable.
  2. Once it has downloaded, launch the installer.
  3. Select I agree to proceed with the installation. Setup begins, as shown in Figure 11.10.

Figure 11.10 – AIP UL client installation

  1. Click Close to exit the installer.

Next, it’s time to move on to the scanner cluster installation.

Microsoft Purview Compliance Portal Activity Explorer – Implementing Microsoft Purview data loss prevention (DLP)

Activity explorer is a dashboard-style interface that displays charts for the various compliance activities in Microsoft 365, including file deletions, archive creations, label applications, DLP rule matches, and content classification.

Figure 11.30 depicts the default view of the dashboard with the Activity dropdown selected to show the filter options:

Figure 11.30 – Activity explorer dashboard

You can use the filters to locate and display only the data that matches your criteria. Once you have identified the type of data to display, you can select an individual event to view the details surrounding it, as shown in Figure 11.31:

Figure 11.31 – Viewing details of an event in Activity explorer

Activity explorer, whether it is the Activity explorer node under Data classification or under Data loss prevention, shows exactly the same data and events. Some activity details may direct you to individual devices or other items in the Microsoft 365 Defender portal. DLP activities are not typically linked to other pages, however.

Microsoft 365 Defender Alerts Dashboard

The Microsoft 365 DefenderAlerts dashboard displays security-related alerts generated throughout your Microsoft 365 tenant. SeeFigure 11.32:

Figure 11.32 – Microsoft 365 Defender Alerts dashboard

The Alerts dashboard shows the current status of alerts as well as information about the category of the alert, where the alert originated, its severity, and its impacted assets. In the case of DLP alerts, the detection source is Microsoft DataLoss Prevention.

Selecting the row of an event brings up a details flyout, providing information regarding the alert’s source and classification. See Figure 11.33:

Figure 11.33 – Alert detail flyout

From this flyout, you can select Open alert page to view the overall alert and the alert story, Manage alert to update its status, or the ellipsis () for the additional options Link alert to another incident and Ask Defender Experts.

Like the compliance portal’s Alerts and Activity explorer views, there aren’t remediation tasks that can be performed on these pages.

Microsoft 365 Defender Incidents Dashboard

From the perspective of responding to alerts, the Microsoft 365 DefenderIncidents dashboard gives you the most capability, as shown in Figure 11.34:

Figure 11.34 – Microsoft 365 Defender Incidents dashboard

While the other dashboards only highlight activity and events, the Incidents dashboard allows you to see the most detail and the context of the alert inside the incident’s attack story. By selecting an incident, you can review the attack story (chain of related events) as well as the corresponding alerts and assets involved.

In this DLP example, the user sent a file with sensitive information. It could have been accidental or intentional, or it could also have represented a malicious actor who has gained control of the user’s account and is attempting to exfiltrate data.

By selecting the Assets tab in an incident, for example, you can locate the impacted user and choose to perform activities against that user such as requiring the user to sign in again, suspending the account, or confirming the identity as compromised. See Figure 11.35:

Figure 11.35 – Viewing the user actions in a DLP incident

By selecting the Evidence tab of the incident and then selecting an item inside it, you may be presented with the Go hunt option. This will create a hunting query targeting this item to help you locate it in the organization. See Figure 11.36:

Figure 11.36 – Microsoft 365 Defender incident evidence

Selecting Run query on the Advanced hunting window will take the pre-loaded query and return corresponding results. See Figure 11.37:

Figure 11.37 – Advanced hunting results

Selecting the hyperlinked value in the NetworkMessageId column (shown in Figure 11.37) will display details of the actual item (Figure 11.38). From there, you can perform remediation tasks.

Figure 11.38: Advanced hunting item details

By selecting Take action, as shown in Figure 11.38, you can initiate a variety of triage and response tasks to help mitigate or resolve the issue. Depending on the data type and risk, you may want to move the item or delete it altogether. You can use the message details to create additional rules for restricting content as well.

Figure 11.39 – Initiating remediation tasks

Additional remediation options from this page include launching an investigation or contacting the user.

Creating a sublabel– Implementing Microsoft Purview Information Protection and Data Lifecycle Management

Sublabels function almost exactly like sensitivity labels—you can think of them as higher up the hierarchy to give you more specificity when categorizing data. For example, in Figure 10.43, you can see that Anyone (unrestricted) and All Employees (unrestricted) are configured as sublabels of the General label:

Figure 10.43 – Sublabel example

There may be instances when you have a broad category for labeling content but want to use an additional method or level of classification. This is where sublabels can be helpful.

There are a few important points to consider when using sublabels:

• A sublabel inherits its color settings from its parent.
• When a label has sublabels configured, the parent label can’t be used to classify content—only the sublabel can be used.

Note
If a label has sublabels, it’s important that the parent label not be used as a default label.
To create a sublabel, follow these steps:

  1. In the Microsoft Purview compliance portal (https://compliance.microsoft.com), expand Information protection, and select Labels.
  2. Locate the label that will be the parent label and select it.
  3. Click Create sublabel, as shown in Figure 10.44:

Figure 10.44 – Creating a sublabel

  1. On the Name and tooltip page as shown in Figure 10.45, enter values for Name, Display name, and Description for users. Note that the Label color choice is non-selectable. If a label color has already been chosen for the parent, this sublabel will inherit that color.

Figure 10.45 – Reviewing name and tooltip settings

  1. Click Next to continue configuring the label. The remaining steps are the same as configuring a standalone or parent label. Refer to the previous section for details and options.

Now that you’ve successfully configured labels, let’s briefly look at configuring label policies.

Implementing sensitivity label policies

Label policies are the configuration objects that are used to either assign labels to content or make them available for users to apply. Sensitivity labels can be applied in a number of ways:

• Label policies (client-side labeling):

Manual labels (with M365 E3, E5, G3, G5, F1, or F3 licensing)

Default labels (with M365 E3, E5, G3, G5, F1, or F3 licensing)

Recommended labels (with M365 E5 or G5 licensing)

• Auto-labeling (service-side labeling):

Available only to M365 E5 or G5 licensing

The automatic label application options can be confusing, since there are two types of label policies that appear at first glance to do the same thing. Let’s dig into each of them now.

Microsoft Purview Compliance Portal Alerts Dashboard – Implementing Microsoft Purview data loss prevention (DLP)

The easiest place to view DLP alerts is on the Alerts dashboard, located in the Microsoft Purview compliance portal under Data loss prevention. Figure 11.26 depicts an alert that was generated based on a DLP policy using a template to detect personal information, such as social security numbers:

Figure 11.26 – Viewing a DLP alert

You can view more details about the alert by selecting the View details button at the bottom of the flyout. The detail view of an alert displays a number of fields on the Overview tab, such as a plain-text summary of the event, actor details (who did it), the policy that was matched, and the corresponding rule and sensitive information types inside the rule, basic information about the alert, such as the severity and time detected, as well as other alerts related to the user or actor. See Figure 11.27:

Figure 11.27 – Alert detail page

On the Manage alert pane, you can update the status of a particular DLP event. When first detected, the alert is set to Active. You can select additional statuses such as Investigating, Dismissed, or
Resolved. Updating the status in the Alerts dashboard to Investigating will set the corresponding event’s status to In Progress in the Microsoft 365 Defender incident. Updating the alert status to either Dismissed or Resolved will set the corresponding event’s status to Resolved in the Microsoft 365 Defender incident.

Note
While setting the alert’s status to Dismissed or Resolved in the compliance portal will update the alert’s status to Resolved in the Microsoft 365 Defender portal, setting an alert’s status to Dismissed will also result in the classification in Microsoft 365 Defender being set toFalse positive.

Selecting the Events tab on the alert detail page will show much of the same information but arranged in a different order. New data presented, however, includes additional information about actors and intended recipients, classifiers or sensitive info types used to match content, and the context of the data inside the file or message that triggered the alert.

If you’ve configured a policy to allow user override and the user exercised that option, you can see that data here as well, along with any business justification text that was submitted, as shown in Figure 11.28:

Figure 11.28 – Event detail view of an alert

If you have configured encryption for the items matching the DLP policy, the Source tab may display a warning that the content is encrypted, prompting you to download the file or message in order to view it. However, the Classifiers tab will show examples of content that matches the policy rules. It’s important to only delegate compliance-related roles to individuals your organization trusts to address issues arising from viewing potentially sensitive information. The Metadata tab will show the underlying data for the policy match conditions and will also include the matched content values.

On the Actions tab for an event, you can choose to download the item or mark it as Not a match.

If you select Not a match, you have the option of submitting a redacted sample to Microsoft to help improve the accuracy of scan detections. See Figure 11.29:

Figure 11.29 – Submitting a redacted false positive sample to Microsoft

While this section specifically covers the DLP view of the Alerts dashboard, the broader compliance portal Alerts view is the same but also includes compliance events from sources besides DLP. The management tasks, item details, and interfaces are the same.

Exchange Online, SharePoint Online, OneDrive for Business, and Teams – Implementing Microsoft Purview data loss prevention (DLP)-2

  1. When editing the DLP content matching rules, you can add sensitive information types and trainable classifiers to groups, as well as adjust the confidence and instance count requirements. By default, objects are joined with OR conditions (Any of these), but you can also set the join criteria to AND (All of these) to create more stringent requirements for detecting data. See Figure 11.6:
This image has an empty alt attribute; its file name is %E5%9B%BE%E7%89%87-24.png

Figure 11.6 – Editing a DLP match rule

  1. Additional rule settings that you can modify from this page include alert notifications as well as allowing or prohibiting override conditions. If configuring aggregated alert thresholds, you can select the Send alert when the volume of matched activities reaches a threshold radio button and then set numeric values corresponding to the minimum number of instances or detections to trigger an alert and what the monitored time period is.
  2. Click Save once you’ve finished editing the rule conditions.
  3. On the Info to protect subpage, click Next.
  4. On the Protection actions page, as shown in Figure 11.7, determine which options to enable.

Exam Tip
If you are customizing a default policy template (as opposed to creating an advanced DLP rule), you will not be able to select Restrict access or encrypt the content in Microsoft 365 locations. That feature is only configurable inside an advanced DLP rule at this time.

This image has an empty alt attribute; its file name is %E5%9B%BE%E7%89%87-23.png

Figure 11.7 – Configuring protection actions

  1. For any of the supported options, you can customize the policy tip, email, and alert notifications. When you’re finished, click Next.
  2. On the Customize access and override settings subpage, as shown in Figure 11.8, edit any options. You may not be able to select options on this page depending on what locations or other options have selected. Auditing or restricting activities on devices, for example, is only available if you have the Devices location enabled for the policy.
This image has an empty alt attribute; its file name is %E5%9B%BE%E7%89%87-22.png

Figure 11.8 – Customize access and override settings

  1. On the Policy mode page, choose the setting for policy enablement. You can choose Test it out first (sometimes referred to as Audit mode), Turn it on right away, or Keep it off. Click Next when you’re finished.
  2. On the Finish page, review the policy settings. Edit them if necessary, and then click Submit to configure the policy.

After choosing to turn on a policy, it may take up to an hour to be enforced across your tenant.

Power BI
DLP for Power BI includes many of the same features as standard policies, with the following exceptions and caveats:

• When creating a policy, you can only select the Custom category and policy template.
• You can only select the Power BI location in the policy. You cannot configure other locations in the same policy.
• DLP actions are only supported in workspaces hosted in Premium capacities.
• You cannot use trainable classifiers to identify data.

All other features and capabilities are supported.