Label policies– Implementing Microsoft Purview Information Protection and Data Lifecycle Management

Label policies are on the client side and work inside applications such as Outlook and Word and in the web user interfaces for SharePoint, OneDrive for Business, and Power BI. Label policies can be made available to users via administrative units or to individual users and groups. Additionally, label policies can be made mandatory—that is, users are required to choose from the published labels to apply to content in the Office apps, documents, meetings, and Power BI content.

The wizard to publish label policies can be activated after a label has been created, or separately.

In the following example, you’ll look at creating a label policy for an existing label:

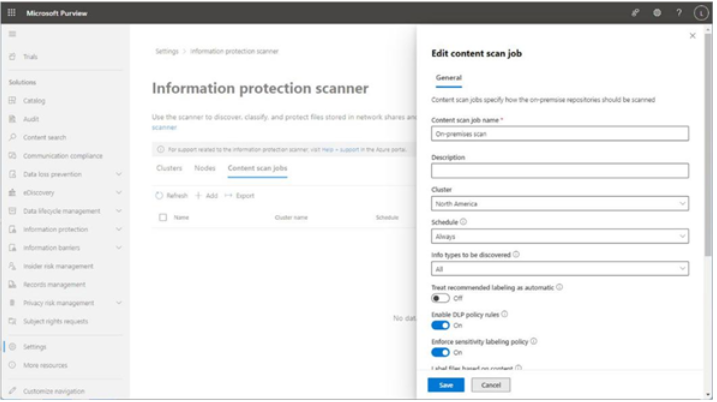
  1. In the Microsoft Purview compliance portal (https://compliance.microsoft.com), expand Information protection and select Label policies.
  2. Click Publish label, as shown in Figure 10.46:

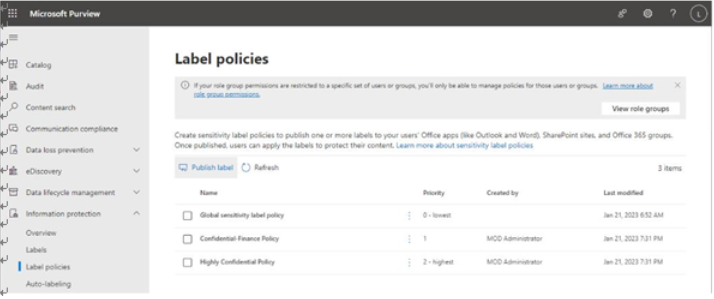
Figure 10.46 – Publishing a label

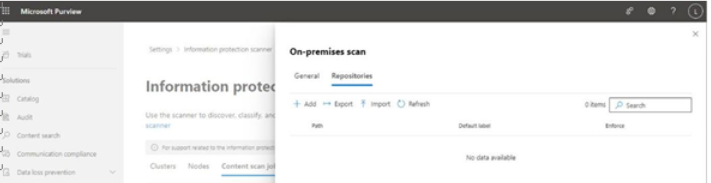
  1. On the Labels to publish page, as shown in Figure 10.47, click Choose sensitivity labels to publish and then select the labels to publish from the list. Click Add to add the labels to the list of labels that will be published as part of the policy. Click Next to continue.

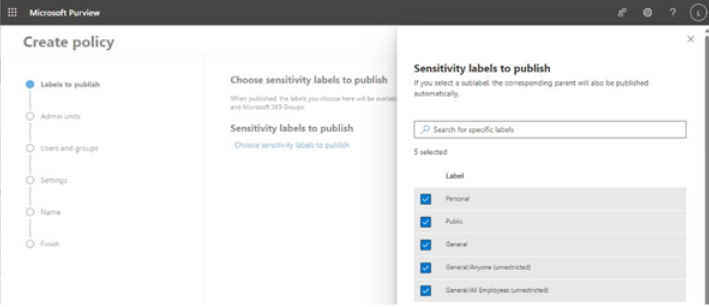
Figure 10.47 – Selecting labels to publish

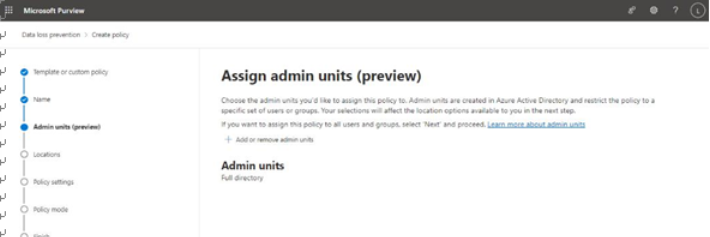
  1. On the Admin units page, choose which administrative units to use for scoping the policy. By default, the entire tenant is selected. Click Next.
  2. On the Users and groups page, select which users or groups will receive the label policy. By default, all users and groups are included. Click Next.
  3. On the Settings page, choose the appropriate settings to apply to this policy. You can choose from Users must provide a justification to remove a label or lower its classification, Require users to apply a label to their emails and documents, Require users to apply a label to their Power BI content, and Provide users with a link to a custom help page. Click Next.

The Users must provide a justification to remove a label or lower its classification option has no additional configuration options, but users will have to enter classification text (which will be logged) when changing the label. Lowering a classification corresponds to its priority on the Label policies page.

The Provide users with a link to a custom help page option has only a single configuration field—a URL—which must be specified on this page.

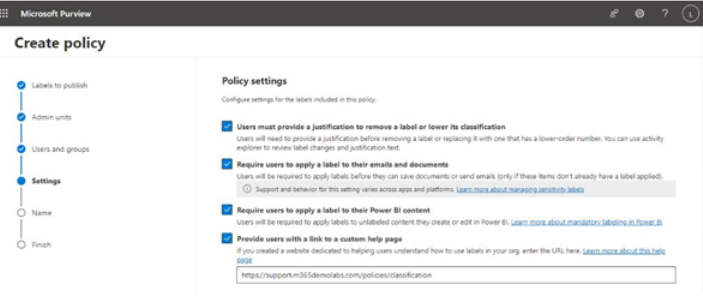
Figure 10.48 – Configuring policy settings

  1. On the Documents page, if you want to specify a default label, select it from the list of labels. The default label will be applied to the label automatically, though the user can select a different label from their available labels if the sensitivity of the content warrants a change. Click Next.
  2. On the Emails page, select Default label (you can choose Same as document) to choose the same label as you selected on the Documents page or one of the other available labels. It’s recommended to choose the Same as document label to help users avoid confusion and ensure consistency. If you selected Require users to apply a label to their emails and documents on the Settings page, you can choose Require users to apply a label to their emails on this page. You can also choose the Email inherits highest priority label from attachments option if you want an attachment’s assigned label to be able to potentially override an email label’s priority.

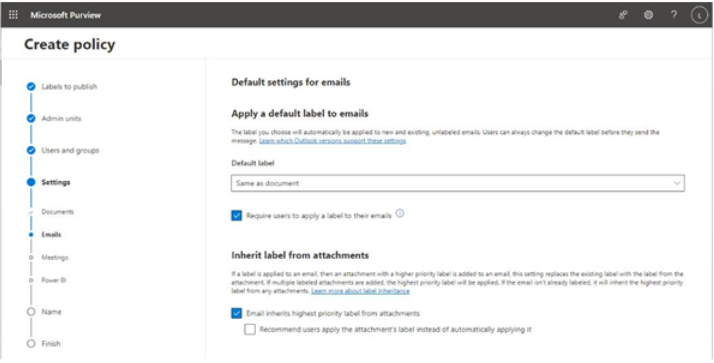
Figure 10.49 – Configuring email settings

  1. Click Next.
  2. If your organization requires labeling of all items (including calendar items), you have options for managing label application on the Apply a default label to meetings and calendar events page. You can choose a default label as well as the Require users to apply a label to their meetings and calendar events option (if the Require… checkbox was selected on the Settings page). If you don’t have a reason to require labeling of calendar invitations, leave the setting cleared. Click Next.
  3. On the Power BI page, you can choose a default label that will be applied to Power BI content. Organizations that have mandatory classification requirements should configure this option to help ensure compliance. For the exercise, select one of the labels that you have configured and click Next.
  4. On the Name page, enter a Name value for the label policy. Click Next.
  5. On the Finish page (depicted in Figure 10.50), review the settings and click Edit to change them if necessary, or click Submit to finish creating the policy.

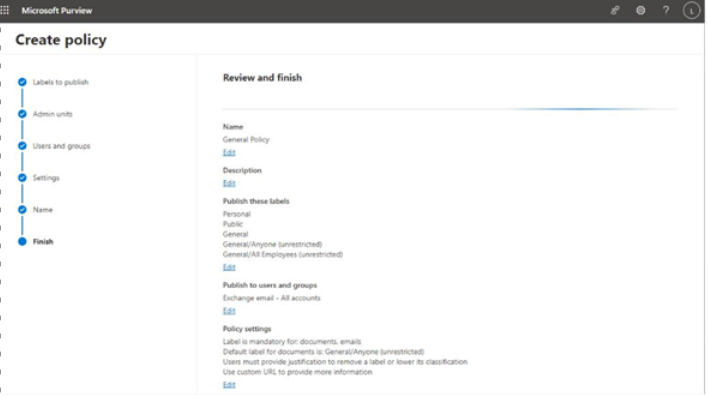
Figure 10.50 – Reviewing the final settings

After you’ve configured the label publishing policy, the labels will show up for use in application and user interfaces.

Exchange Online, SharePoint Online, OneDrive for Business, and Teams – Implementing Microsoft Purview data loss prevention (DLP)-1

DLP policies are used in the following contexts for core Microsoft 365 workloads:

• Exchange Online: Apply controls or restrictions to messages as they are sent or received by individuals in the organization.

• SharePoint Online and OneDrive for Business: Restrict sensitive content as it is added to a sharing invitation.

• Teams: Restrict sensitive content as it is entered into a chat or channel message.

• Devices: Protect content on endpoint devices. This option requires additional configuration.

• On-premises file servers: Protect content in connected on-premises repositories. This option requires additional configuration.

To configure a workload DLP policy, follow these steps:

  1. Navigate to the Microsoft Purview compliance portal (https://compliance.microsoft. com).
  2. Under Solutions, expand Data loss prevention and then select Policies.
  3. Click Create policy. See Figure 11.1:

Figure 11.1 – Microsoft Purview compliance policies page

  1. Choose whether to use one of the built-in templates or to create a new custom policy.

Built-in templates are broken into categories such as Enhanced (various international legislation, finance, or privacy regulations, which utilize trainable classifiers to extend detection capabilities), Financial (international financial data types), Medical and health (healthcare legislation, terms, and personal information), and Privacy (international privacy regulations or legislation). You can only choose one template; if you want to include more than one template data type, you’ll need to select Custom and add the sensitive information types or other classifiers manually.

  1. Click Next when the policy type has been selected. See Figure 11.2:

Figure 11.2 – Selecting a template or policy type

  1. On the Name page, enter a value to identify your policy. Click Next.
  2. On the Admin units page, as shown in Figure 11.3, choose whether the DLP policy will apply to the whole organization or only to members of a particular administrative unit.

Figure 11.3 – Assigning an administrative unit

Click Next when you’re finished.

  1. On the Locations page, as shown in Figure 11.4, choose which workloads and locations the policy will be applied to. You can enable all workloads and locations as part of a single policy, with the exception of Power BI. While you can enable devices and on-premises repositories now, those locations will require additional steps to fully onboard and protect. Also, if you are using a new enhanced DLP template for your policy, on-premises repositories aren’t supported.

Figure 11.4 – Adding workloads and locations to the policy

For each location, you can apply filters to include or exclude objects (such as users, groups, sites, or devices). When finished, click Next.

  1. On the Policy settings page, determine what DLP rules you want to apply. You could choose from Review and customize the default settings from the template or Create or customize advanced DLP rules. They both have similar capabilities, though the Create or customize advanced DLP rules option has more flexibility in creating conditions with a more complex editing interface. In this example, you’ll just choose the Review and customize the default settings from the template option, though we’d recommend experimenting with both so you can see the flexibility of the options. Click Next.
  2. On the Info to protect subpage, as shown in Figure 11.5, select Edit to modify the DLP rule conditions:

Figure 11.5 – Reviewing the Info to protect page

Exam Tip
If you have selected the Devices or On-premises repositories location, you will not see or be able to select the Detect when this content is shared from Microsoft 365option. If you have selected SharePoint or OneDrive locations, you will not be able to see or use the User’s risk level for Adaptive protection is control. You’ll have to evaluate what features you need to use and potentially create separate policies to protect data in different locations with different features.

Configuring Scanner Settings – Implementing Microsoft Purview data loss prevention (DLP)

Before you install the scanner, you need to create a scanner cluster configuration object in the Microsoft Purview compliance portal. This cluster configuration will be used to identify scanner clusters in your organization; for example, an organization with multiple geographic locations may opt to deploy scanner clusters at each site.

To create a scanner cluster, follow these steps:

  1. Navigate to the Microsoft Purview compliance portal (https://compliance.microsoft. com) and sign in with an identity that is a member of the Compliance Administrator, Compliance Data Administrator, or Organization Management role.

Exam Tip
The product documentation directs you to the Microsoft Purview compliance portal to set up a scanner cluster, though it doesn’t actually specify where. The option to configure is only visible after assigning the Compliance Administrator, Compliance Data administrator, or Organization Management role and can take up to two hours to display in the portal console after enablement. The compliance portal settings are located at Settings | Information protection scanner. There is also a link at More resources | Azure Information Protection, which redirects you to the AIP blade of the Azure portal (https://portal.azure. com/#blade/Microsoft_Azure_InformationProtection). The steps are nearly identical in either case.

  1. Select Settings and then choose Information protection scanner.
  2. Select the Clusters tab. See Figure 11.11:

Figure 11.11 – AIP clusters page

  1. Click Add.
  2. On the New cluster flyout, enter a name and description. Click Save.

Next, you’ll create a scan job that will be used to discover content located in your on-premises locations.

Configuring Content Scan Jobs
For this task, you’ll need on-premises Universal Naming Convention (UNC) paths or SharePoint site URLs where the content to protect is stored. Once you have collected file paths, you can follow these steps to configure a content scan job:

  1. From the Microsoft Purview compliance portal, selectSettings | Information protection scanner.
  2. Select the Content scan jobs tab.
  3. Select Add to create a new scan job.
  4. Enter a content scan job name.
  5. From the Cluster dropdown, select a configured cluster.
  6. Configure a Schedule (either Manual or Always). Manual scans will need to be initiated via the Start-AIPScan cmdlet on the server or through the portal, while scans set to Always will run as background tasks on the assigned cluster.
  7. Update the Info types to be discovered dropdown to Policy only to detect content based on your already-configured DLP policy settings or All to detect all sensitive information types available in the tenant (including both default and custom sensitive information types).
  8. Scroll the flyout down. Under DLP policy, set the Enable DLP policy rules slider to On.

Figure 11.12 – Configuring content scan job settings

  1. Click Save.
  2. Close the content scan job configuration and then re-open it.
  3. Select the Repositories tab. See Figure 11.13:

Figure 11.13 – Configuring repositories for the scan

  1. Click Add.
  2. On the Repository flyout, add the path and then click Save. See Figure 11.14:

Figure 11.14 – Configuring repository settings

  1. Repeat the process for each repository (file share or SharePoint site) that this scanner cluster will be responsible for checking.

After you have finished configuring all of the repositories for this content scan job, it’s time to start configuring the necessary app registration.

Installing and Configuring the Scanner– Implementing Microsoft Purview data loss prevention (DLP)

Once you’ve got the AIP UL client deployed, the scanner settings configured, and the app registration details, you can begin installing scanner cluster nodes in your on-premises environment. You’ll need the name of the scanner cluster that you created in the Microsoft Purview compliance portal to complete this task, as well as a service account that will be used to run the local service.

To install and configure the scanner service, follow these steps:

  1. On a server that you wish to use to deploy the scanner, launch an elevated PowerShell session.
  2. From the elevated prompt, run the following command:

Install-AIPScanner -SQLServerInstanceName -Cluster
For example, if you deployed a local SQLExpress database instance and are using a scanner cluster called North America, you could enter the following:
Install-AIPScanner -SQLServerInstanceName .\SQLExpress -Cluster “North America” See Figure 11.19:

Figure 11.19 – Starting the AIP scanner installation

  1. When prompted, enter the service account credential that will be used.
  2. Wait for the configuration to be completed.

Figure 11.20 – Installing the AIP scanner

  1. In the elevated PowerShell console on the server where the AIP scanner was installed, run the following command:

Set-AIPAuthentication -AppID -AppSecret -TenantId -DelegatedUser [email protected]

Once the scanner has been registered with the cluster, the content scan you configured will start. You can then use the on-premises repository location as part of a DLP policy.

Next, you’ll shift to managing Endpoint DLP.
Implementing Endpoint DLP
To this point, you’ve been working with managing DLP capabilities for content that is stored in the Microsoft 365 service or moving across the Microsoft 365 ecosystem—through applications such as Exchange Online and SharePoint Online.

But what if the data is created or stored on an endpoint device? Can organizations use the same types of DLP technology to protect and alert on activities with that data?

Yes! Microsoft’s Endpoint DLP can do exactly this!
Some of the features of Endpoint DLP include the following:

• Restricting application access to sensitive data
• Automatically quarantining content being accessed from restricted apps
• Preventing protected files from being transferred via Bluetooth
• Preventing certain browsers from accessing protected content
• Preventing browsers from uploading to restricted domains
• Restricting the transfer of protected content to USB storage devices
• Restricting printing

Many organizations—especially those that deal with confidential information—need to be able to protect data against unauthorized storage and use. Endpoint DLP is a great solution to help achieve that.

Further Reading
For a complete list of monitored activities, see https://learn.microsoft.com/en-us/microsoft-365/compliance/endpoint-dlp-learn-about?view=o365-worldwide#endpoint-activities-you-can-monitor-and-take-action-on.

• In addition to preventing certain types of activities, endpoint DLP also monitors activities across a wide variety of files on both Windows and macOS platforms. Out of the box, endpoint DLP monitors documents (.doc, .docx, etc.), spreadsheets (.xls, .xlsx, etc.), archive files (.zip, .tr, etc.), and presentations (.ppt, .pptx, etc.), regardless of whether a policy is configured to monitor or act on them. Endpoint DLP can even be integrated with Azure Optical Character Recognition (OCR) to scan PDF images, JPGs, and other image files.

What’s in a Name?
Endpoint DLP supports documents and files based on their Multipurpose Internet Mail Extension (MIME) type, so changing a file’s extension name won’t affect whether Endpoint DLP is able to capture audit log data or enforce a policy against it.

Endpoint DLP has two requirements: a supported operating system and a supported subscription. Endpoint DLP can be enabled for Windows 10, Windows 11, and macOS 10.5 or later devices and requires one of the following subscriptions:

• Microsoft 365 E5/A5/G5
• Microsoft 365 E5/A5/F5/G5 Compliance and F5 Security & Compliance
• Microsoft 365 E5/A5/F5/G5 Information Protection & Governance

With those requirements out of the way, let’s go through the onboarding process.
Since endpoint DLP builds on the Microsoft Defender for Endpoint(MDE) product, it can be onboarded using a variety of methods (Intune, Group Policy, Configuration Manager, and scripts). Microsoft’s best practice for organizations using the entire Microsoft 365 suite is to use Intune to deploy and configure policies.

Note
If using Intune to deploy endpoint DLP, the devices must be Intune enrolled.

If you’ve already got MDE onboarded, the next step is to onboard the devices into the Microsoft Purview compliance portal. To configure onboarding through Purview, follow these steps:

  1. Navigate to the Microsoft Purview compliance portal (https://compliance.microsoft. com) and select Settings | Device onboarding. See Figure 11.21:

Figure 11.21 – Device onboarding

  1. In the middle pane, select Devices and then select Turn on device onboarding in the main window.

Figure 11.22 – Turning on device onboarding

  1. Acknowledge the prompt that existing MDE devices will be automatically onboarded by clicking OK.
  2. Click OK to acknowledge that device monitoring has been turned on.

That’s it! That’s all it takes. You can view the status for devices on the Devices tab of the Device onboarding page, as shown in Figure 11.23:

Figure 11.23 – List of onboarded devices

The Configuration status column will show that the device has received the updated onboarding configuration. The Policy sync status column will show whether DLP policies have been synchronized to the device.

The policy sync status can take up to two hours to show up, so you may need to be patient. You can attempt to trigger the policy application to come down sooner using the Resync button in the Intune management portal (Devices | Windows devices or macOS devices | Overview) or by restarting the device itself.

After the policy refresh cycle has completed, when you select an onboarded device from the Settings | Device onboarding | Devices page, you can see which device DLP policies have been synchronized, as shown in Figure 11.24:

Figure 11.24 – Viewing synchronized DLP policies

Next, you’ll look at working with DLP alerts.

Implementing DLP for Workloads – Implementing Microsoft Purview data loss prevention (DLP)

Many workloads and services in the Microsoft 365 platform support DLP capabilities. DLP detects content based on a variety of mechanisms, such as keywords, built-in functions, and secondary matches that are located in proximity to the primary matched content. Microsoft Purview DLPcan also use document fingerprinting and machine learning algorithms to detect content.

Depending on the workload or application, DLP policies can take the following actions on detected content:

  • Display a notification (called a policy tip) that warns the users about sensitive content
  • Block sharing with or without the ability for the end user to override the block
  • Move sensitive items to a quarantine location
  • Prevent sensitive content from being displayed in a Teams chat
  • Encrypt content

DLP, from the workload perspective, can be applied to data in transit, data at rest, and data in use. In the following sections, you’ll review configuring DLP settings for the Exchange Online, SharePoint, OneDrive for Business, Teams, and Power BI workloads, as well as an overview of protecting on-premises file shares with the Azure Information Protection (AIP) scanner.

Prerequisites

DLP has license subscription requirements. Depending on the workload to be protected, users need one of the following licenses:

  • Microsoft 365 E3/A3/A5/E5/A5/G5
  • Microsoft 365 Business Premium
  • SharePoint Online Plan 2
  • OneDrive for Business Plan 2
  • Exchange Online Plan 2

• Microsoft 365 E5/A5/F5/G5 Compliance and F5 Security & Compliance • Microsoft 365 E5/A5/F5/G5 Information Protection & Governance

In addition, DLP for Microsoft Teams (chat and channel messages, in particular) and on-premises repositories requires one of the following licenses:

•    Microsoft 365 E5/A5/G5

•    Microsoft 365 E5/A5/F5/G5  Compliance or F5 Security & Compliance

•    Microsoft 365 E5/A5/F5/G5 Information Protection & Governance

In order to configure DLP policies, you must be a member of one of these role groups:

  • Compliance Administrator
  • Compliance Data Administrator
  • Information Protection
  • Information Protection Admin
  • Security Administrator

Organizations with any eligible subscription with DLP features (such as E1, F1, G1, A3, E3, G3, A5, E5, or G5) can create DLP alerts that are triggered on every matching activity.

Organizations with an A5, E5, or G5 subscription or an Office 365 Advanced Threat Protection Plan 2, Microsoft 365 E5 Compliance, or Microsoft 365 eDiscovery and Audit add-on license can configure aggregated alerts—meaning that DLP alerts will only show up based on a certain threshold.

With that being said, let’s look at configuring some workload policies!

Configuring Workload Protection

In this section, you’ll walk through configuring workload protections at a high level using built-in templates.

Configuring an Azure App Registration – Implementing Microsoft Purview data loss prevention (DLP)

The AIP scanner application requires an Azure app registration in order to obtain a token from Azure for interacting with the Azure Information Protection service endpoint. To configure this registration, you’ll need to follow these steps:

  1. Navigate to the Azure portal (https://portal.azure.com). Select Azure Active Directory (or Microsoft Entra ID) and then click App registrations.
  2. Select New registration.
  3. Enter a name, such as AIPScanner.
  4. Under Redirect URI, select the platform as Web and enter http://localhost in the text box. See Figure 11.15:

Figure 11.15 – Configuring an app registration

  1. On the app’s Overview page, copy the Application (client) ID and Directory (tenant) ID values to a temporary storage location.
  2. Select Clients & secrets.
  3. Click New client secret.
  4. On the Add a client secret flyout, add a description and set an Expires date value of at least a year. Click Add.
  5. After the secret has been created, copy the Secret ID value to the temporary storage location containing the App ID and Directory ID values. These values will be used in the next section.
  6. On the API permissions page, select Add a permission.
  7. On the Request API permissions flyout, select the Microsoft APIstab. Select Azure Rights Management Services. See Figure 11.16:

Figure 11.16 – Adding permissions on the Request API permissions flyout

  1. Select Application permissions.
  2. Expand the dropdown for Content. Select the Content.DelegatedReader and Content. DelegatedWriter checkboxes. Click Add permissions.
  3. Under Manage, select API permissions and then select Add a permission.
  4. On the Request API permissions flyout, select the APIs my organization uses tab.
  5. Locate the Microsoft Information Protection Sync Serviceentry and select it. See Figure 11.17:

Figure 11.17 – Choosing the Microsoft Information Protection Sync Service API

  1. Select Application permissions.
  2. Select the checkbox for the UnifiedPolicy.Tenant.Read permission. Select Add permissions.
  3. On the API permissions page, click Grant admin consent for . See Figure 11.18:

Figure 11.18 – Granting admin consent

  1. Click Yes to confirm.

With your app registration and client secret details in hand, it’s time to install and configure the actual AIP scanner.