Microsoft Purview Compliance Portal Activity Explorer – Implementing Microsoft Purview data loss prevention (DLP)

Activity explorer is a dashboard-style interface that displays charts for the various compliance activities in Microsoft 365, including file deletions, archive creations, label applications, DLP rule matches, and content classification.

Figure 11.30 depicts the default view of the dashboard with the Activity dropdown selected to show the filter options:
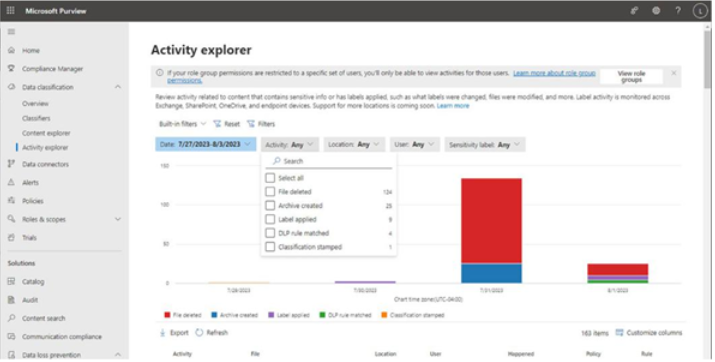
Figure 11.30 – Activity explorer dashboard

You can use the filters to locate and display only the data that matches your criteria. Once you have identified the type of data to display, you can select an individual event to view the details surrounding it, as shown in Figure 11.31:
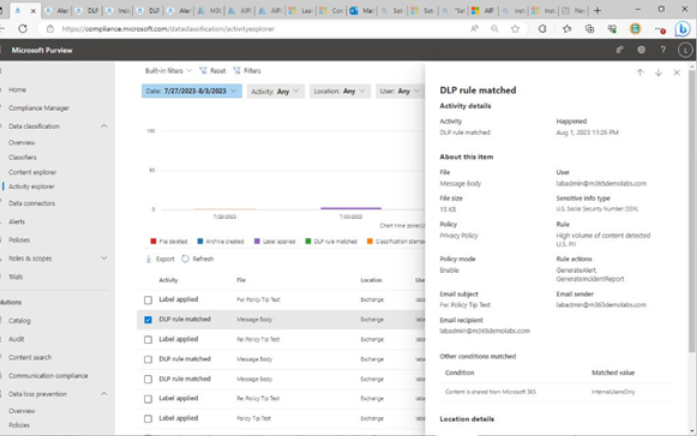
Figure 11.31 – Viewing details of an event in Activity explorer

Activity explorer, whether it is the Activity explorer node under Data classification or under Data loss prevention, shows exactly the same data and events. Some activity details may direct you to individual devices or other items in the Microsoft 365 Defender portal. DLP activities are not typically linked to other pages, however.

Microsoft 365 Defender Alerts Dashboard

The Microsoft 365 DefenderAlerts dashboard displays security-related alerts generated throughout your Microsoft 365 tenant. SeeFigure 11.32:
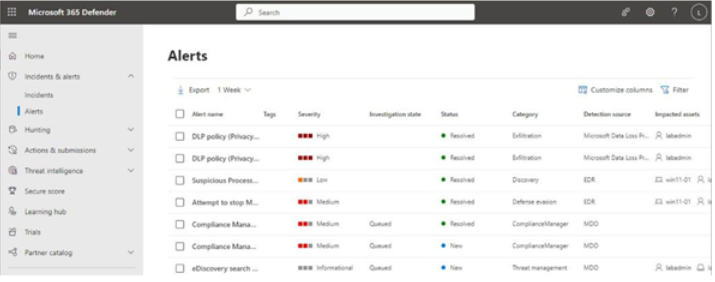
Figure 11.32 – Microsoft 365 Defender Alerts dashboard

The Alerts dashboard shows the current status of alerts as well as information about the category of the alert, where the alert originated, its severity, and its impacted assets. In the case of DLP alerts, the detection source is Microsoft DataLoss Prevention.

Selecting the row of an event brings up a details flyout, providing information regarding the alert’s source and classification. See Figure 11.33:
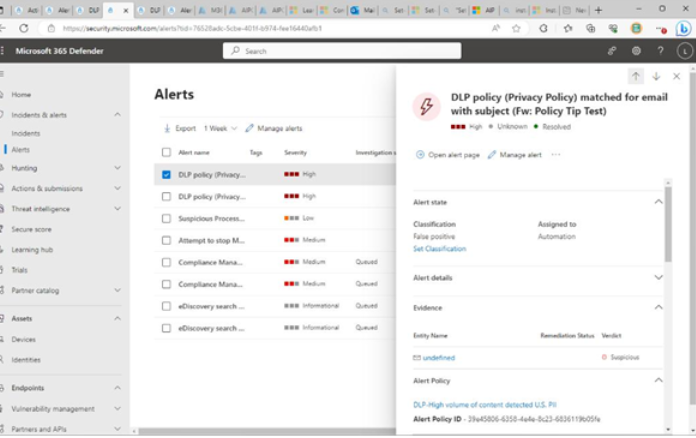
Figure 11.33 – Alert detail flyout

From this flyout, you can select Open alert page to view the overall alert and the alert story, Manage alert to update its status, or the ellipsis () for the additional options Link alert to another incident and Ask Defender Experts.

Like the compliance portal’s Alerts and Activity explorer views, there aren’t remediation tasks that can be performed on these pages.

Microsoft 365 Defender Incidents Dashboard

From the perspective of responding to alerts, the Microsoft 365 DefenderIncidents dashboard gives you the most capability, as shown in Figure 11.34:
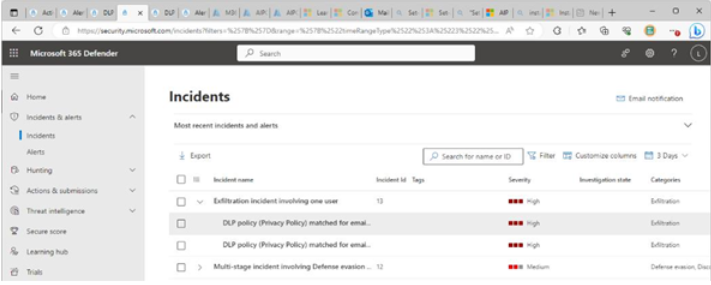
Figure 11.34 – Microsoft 365 Defender Incidents dashboard

While the other dashboards only highlight activity and events, the Incidents dashboard allows you to see the most detail and the context of the alert inside the incident’s attack story. By selecting an incident, you can review the attack story (chain of related events) as well as the corresponding alerts and assets involved.

In this DLP example, the user sent a file with sensitive information. It could have been accidental or intentional, or it could also have represented a malicious actor who has gained control of the user’s account and is attempting to exfiltrate data.

By selecting the Assets tab in an incident, for example, you can locate the impacted user and choose to perform activities against that user such as requiring the user to sign in again, suspending the account, or confirming the identity as compromised. See Figure 11.35:
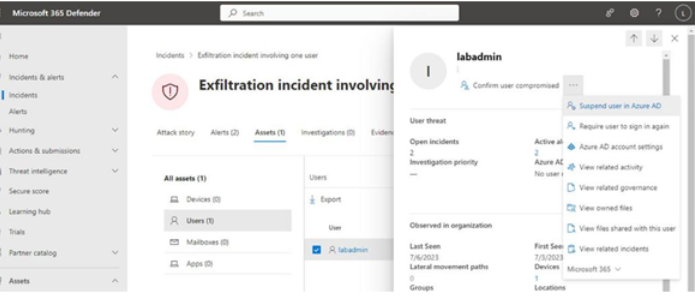
Figure 11.35 – Viewing the user actions in a DLP incident

By selecting the Evidence tab of the incident and then selecting an item inside it, you may be presented with the Go hunt option. This will create a hunting query targeting this item to help you locate it in the organization. See Figure 11.36:
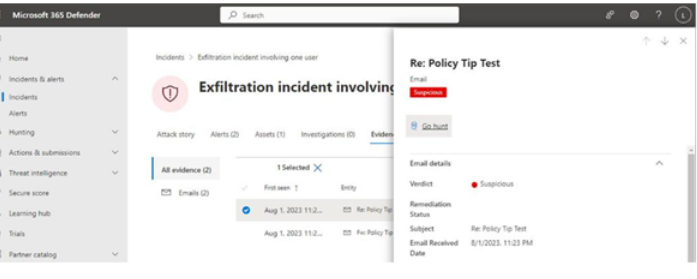
Figure 11.36 – Microsoft 365 Defender incident evidence

Selecting Run query on the Advanced hunting window will take the pre-loaded query and return corresponding results. See Figure 11.37:
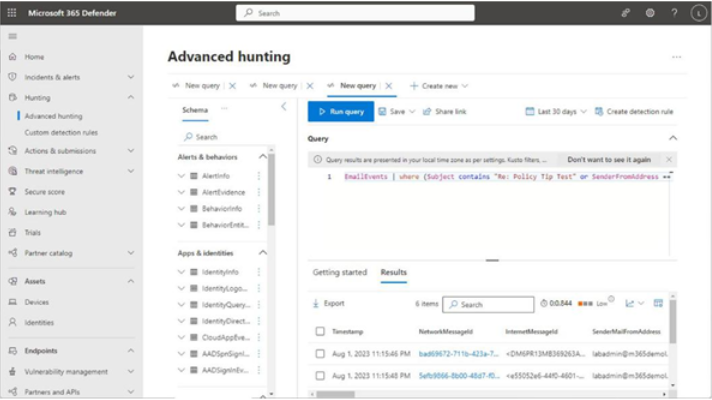
Figure 11.37 – Advanced hunting results

Selecting the hyperlinked value in the NetworkMessageId column (shown in Figure 11.37) will display details of the actual item (Figure 11.38). From there, you can perform remediation tasks.
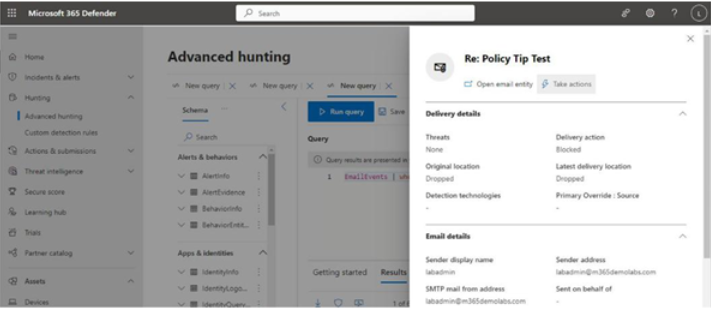
Figure 11.38: Advanced hunting item details

By selecting Take action, as shown in Figure 11.38, you can initiate a variety of triage and response tasks to help mitigate or resolve the issue. Depending on the data type and risk, you may want to move the item or delete it altogether. You can use the message details to create additional rules for restricting content as well.
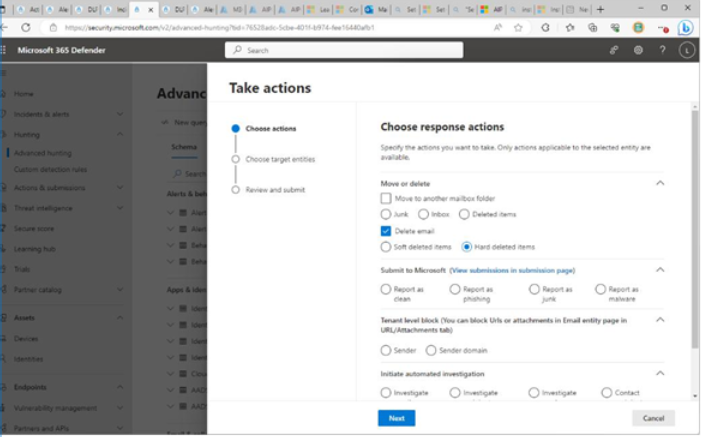
Figure 11.39 – Initiating remediation tasks

Additional remediation options from this page include launching an investigation or contacting the user.

Creating a sublabel– Implementing Microsoft Purview Information Protection and Data Lifecycle Management

Sublabels function almost exactly like sensitivity labels—you can think of them as higher up the hierarchy to give you more specificity when categorizing data. For example, in Figure 10.43, you can see that Anyone (unrestricted) and All Employees (unrestricted) are configured as sublabels of the General label:

Figure 10.43 – Sublabel example

There may be instances when you have a broad category for labeling content but want to use an additional method or level of classification. This is where sublabels can be helpful.

There are a few important points to consider when using sublabels:

• A sublabel inherits its color settings from its parent.
• When a label has sublabels configured, the parent label can’t be used to classify content—only the sublabel can be used.

Note
If a label has sublabels, it’s important that the parent label not be used as a default label.
To create a sublabel, follow these steps:

  1. In the Microsoft Purview compliance portal (https://compliance.microsoft.com), expand Information protection, and select Labels.
  2. Locate the label that will be the parent label and select it.
  3. Click Create sublabel, as shown in Figure 10.44:

Figure 10.44 – Creating a sublabel

  1. On the Name and tooltip page as shown in Figure 10.45, enter values for Name, Display name, and Description for users. Note that the Label color choice is non-selectable. If a label color has already been chosen for the parent, this sublabel will inherit that color.

Figure 10.45 – Reviewing name and tooltip settings

  1. Click Next to continue configuring the label. The remaining steps are the same as configuring a standalone or parent label. Refer to the previous section for details and options.

Now that you’ve successfully configured labels, let’s briefly look at configuring label policies.

Implementing sensitivity label policies

Label policies are the configuration objects that are used to either assign labels to content or make them available for users to apply. Sensitivity labels can be applied in a number of ways:

• Label policies (client-side labeling):

Manual labels (with M365 E3, E5, G3, G5, F1, or F3 licensing)

Default labels (with M365 E3, E5, G3, G5, F1, or F3 licensing)

Recommended labels (with M365 E5 or G5 licensing)

• Auto-labeling (service-side labeling):

Available only to M365 E5 or G5 licensing

The automatic label application options can be confusing, since there are two types of label policies that appear at first glance to do the same thing. Let’s dig into each of them now.

Installing and Configuring the Scanner– Implementing Microsoft Purview data loss prevention (DLP)

Once you’ve got the AIP UL client deployed, the scanner settings configured, and the app registration details, you can begin installing scanner cluster nodes in your on-premises environment. You’ll need the name of the scanner cluster that you created in the Microsoft Purview compliance portal to complete this task, as well as a service account that will be used to run the local service.

To install and configure the scanner service, follow these steps:

  1. On a server that you wish to use to deploy the scanner, launch an elevated PowerShell session.
  2. From the elevated prompt, run the following command:

Install-AIPScanner -SQLServerInstanceName -Cluster
For example, if you deployed a local SQLExpress database instance and are using a scanner cluster called North America, you could enter the following:
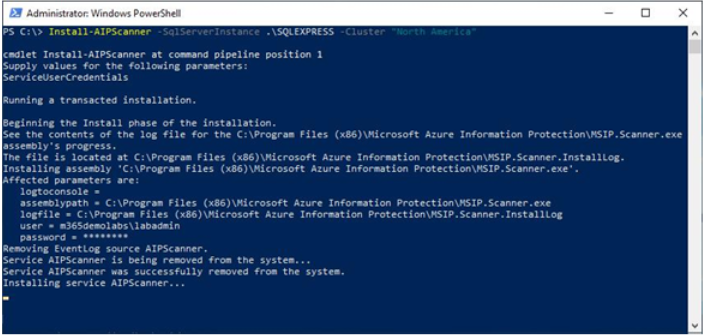
Install-AIPScanner -SQLServerInstanceName .\SQLExpress -Cluster “North America” See Figure 11.19:

Figure 11.19 – Starting the AIP scanner installation

  1. When prompted, enter the service account credential that will be used.
  2. Wait for the configuration to be completed.

Figure 11.20 – Installing the AIP scanner

  1. In the elevated PowerShell console on the server where the AIP scanner was installed, run the following command:

Set-AIPAuthentication -AppID -AppSecret -TenantId -DelegatedUser [email protected]

Once the scanner has been registered with the cluster, the content scan you configured will start. You can then use the on-premises repository location as part of a DLP policy.

Next, you’ll shift to managing Endpoint DLP.
Implementing Endpoint DLP
To this point, you’ve been working with managing DLP capabilities for content that is stored in the Microsoft 365 service or moving across the Microsoft 365 ecosystem—through applications such as Exchange Online and SharePoint Online.

But what if the data is created or stored on an endpoint device? Can organizations use the same types of DLP technology to protect and alert on activities with that data?

Yes! Microsoft’s Endpoint DLP can do exactly this!
Some of the features of Endpoint DLP include the following:

• Restricting application access to sensitive data
• Automatically quarantining content being accessed from restricted apps
• Preventing protected files from being transferred via Bluetooth
• Preventing certain browsers from accessing protected content
• Preventing browsers from uploading to restricted domains
• Restricting the transfer of protected content to USB storage devices
• Restricting printing

Many organizations—especially those that deal with confidential information—need to be able to protect data against unauthorized storage and use. Endpoint DLP is a great solution to help achieve that.

Further Reading
For a complete list of monitored activities, see https://learn.microsoft.com/en-us/microsoft-365/compliance/endpoint-dlp-learn-about?view=o365-worldwide#endpoint-activities-you-can-monitor-and-take-action-on.

• In addition to preventing certain types of activities, endpoint DLP also monitors activities across a wide variety of files on both Windows and macOS platforms. Out of the box, endpoint DLP monitors documents (.doc, .docx, etc.), spreadsheets (.xls, .xlsx, etc.), archive files (.zip, .tr, etc.), and presentations (.ppt, .pptx, etc.), regardless of whether a policy is configured to monitor or act on them. Endpoint DLP can even be integrated with Azure Optical Character Recognition (OCR) to scan PDF images, JPGs, and other image files.

What’s in a Name?
Endpoint DLP supports documents and files based on their Multipurpose Internet Mail Extension (MIME) type, so changing a file’s extension name won’t affect whether Endpoint DLP is able to capture audit log data or enforce a policy against it.

Endpoint DLP has two requirements: a supported operating system and a supported subscription. Endpoint DLP can be enabled for Windows 10, Windows 11, and macOS 10.5 or later devices and requires one of the following subscriptions:

• Microsoft 365 E5/A5/G5
• Microsoft 365 E5/A5/F5/G5 Compliance and F5 Security & Compliance
• Microsoft 365 E5/A5/F5/G5 Information Protection & Governance

With those requirements out of the way, let’s go through the onboarding process.
Since endpoint DLP builds on the Microsoft Defender for Endpoint(MDE) product, it can be onboarded using a variety of methods (Intune, Group Policy, Configuration Manager, and scripts). Microsoft’s best practice for organizations using the entire Microsoft 365 suite is to use Intune to deploy and configure policies.

Note
If using Intune to deploy endpoint DLP, the devices must be Intune enrolled.

If you’ve already got MDE onboarded, the next step is to onboard the devices into the Microsoft Purview compliance portal. To configure onboarding through Purview, follow these steps:

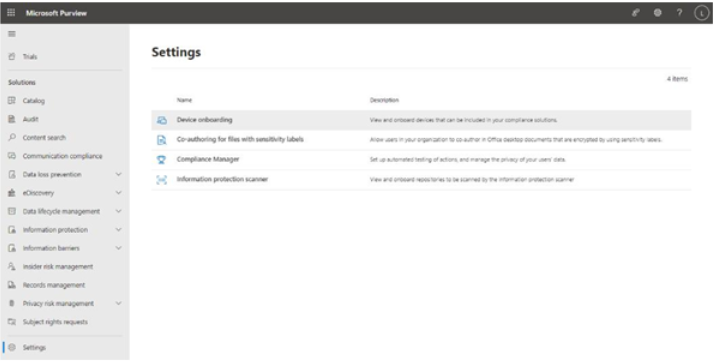
  1. Navigate to the Microsoft Purview compliance portal (https://compliance.microsoft. com) and select Settings | Device onboarding. See Figure 11.21:

Figure 11.21 – Device onboarding

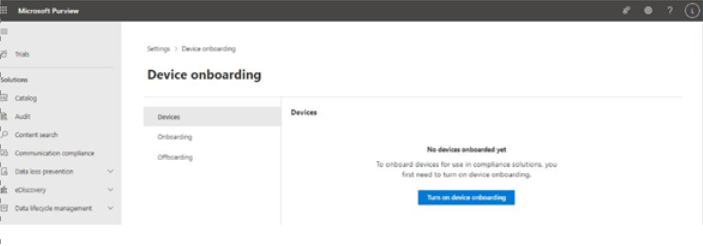
  1. In the middle pane, select Devices and then select Turn on device onboarding in the main window.

Figure 11.22 – Turning on device onboarding

  1. Acknowledge the prompt that existing MDE devices will be automatically onboarded by clicking OK.
  2. Click OK to acknowledge that device monitoring has been turned on.

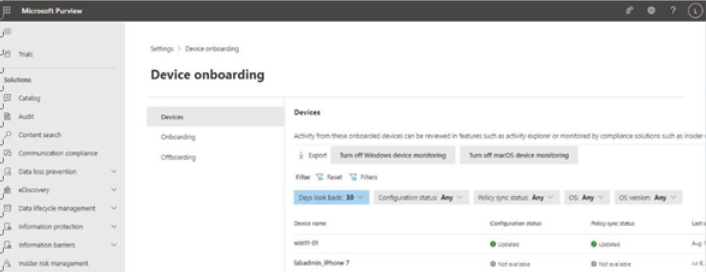
That’s it! That’s all it takes. You can view the status for devices on the Devices tab of the Device onboarding page, as shown in Figure 11.23:

Figure 11.23 – List of onboarded devices

The Configuration status column will show that the device has received the updated onboarding configuration. The Policy sync status column will show whether DLP policies have been synchronized to the device.

The policy sync status can take up to two hours to show up, so you may need to be patient. You can attempt to trigger the policy application to come down sooner using the Resync button in the Intune management portal (Devices | Windows devices or macOS devices | Overview) or by restarting the device itself.

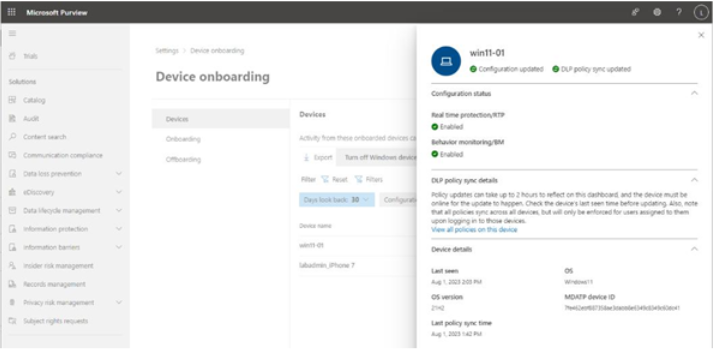
After the policy refresh cycle has completed, when you select an onboarded device from the Settings | Device onboarding | Devices page, you can see which device DLP policies have been synchronized, as shown in Figure 11.24:

Figure 11.24 – Viewing synchronized DLP policies

Next, you’ll look at working with DLP alerts.

Configuring an Azure App Registration – Implementing Microsoft Purview data loss prevention (DLP)

The AIP scanner application requires an Azure app registration in order to obtain a token from Azure for interacting with the Azure Information Protection service endpoint. To configure this registration, you’ll need to follow these steps:

  1. Navigate to the Azure portal (https://portal.azure.com). Select Azure Active Directory (or Microsoft Entra ID) and then click App registrations.
  2. Select New registration.
  3. Enter a name, such as AIPScanner.
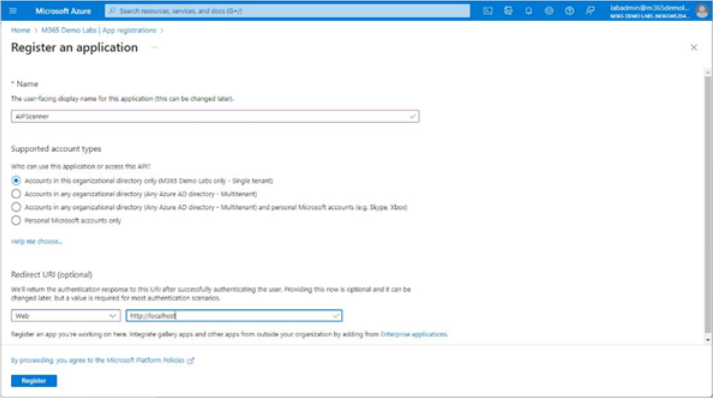
  4. Under Redirect URI, select the platform as Web and enter http://localhost in the text box. See Figure 11.15:

Figure 11.15 – Configuring an app registration

  1. On the app’s Overview page, copy the Application (client) ID and Directory (tenant) ID values to a temporary storage location.
  2. Select Clients & secrets.
  3. Click New client secret.
  4. On the Add a client secret flyout, add a description and set an Expires date value of at least a year. Click Add.
  5. After the secret has been created, copy the Secret ID value to the temporary storage location containing the App ID and Directory ID values. These values will be used in the next section.
  6. On the API permissions page, select Add a permission.
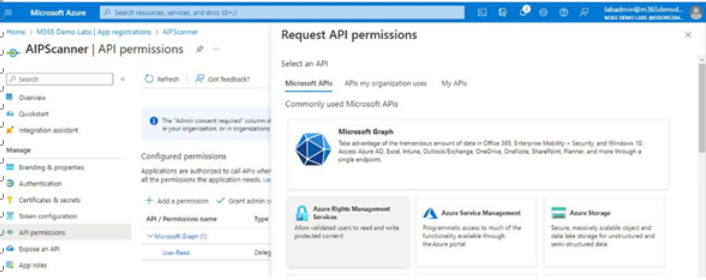
  7. On the Request API permissions flyout, select the Microsoft APIstab. Select Azure Rights Management Services. See Figure 11.16:

Figure 11.16 – Adding permissions on the Request API permissions flyout

  1. Select Application permissions.
  2. Expand the dropdown for Content. Select the Content.DelegatedReader and Content. DelegatedWriter checkboxes. Click Add permissions.
  3. Under Manage, select API permissions and then select Add a permission.
  4. On the Request API permissions flyout, select the APIs my organization uses tab.
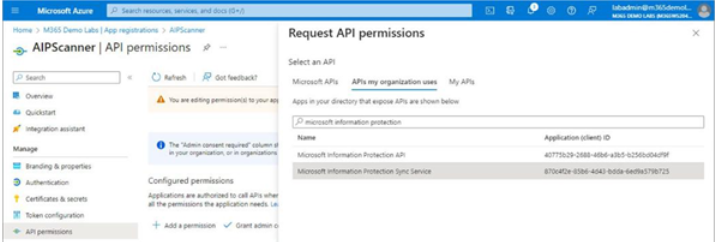
  5. Locate the Microsoft Information Protection Sync Serviceentry and select it. See Figure 11.17:

Figure 11.17 – Choosing the Microsoft Information Protection Sync Service API

  1. Select Application permissions.
  2. Select the checkbox for the UnifiedPolicy.Tenant.Read permission. Select Add permissions.
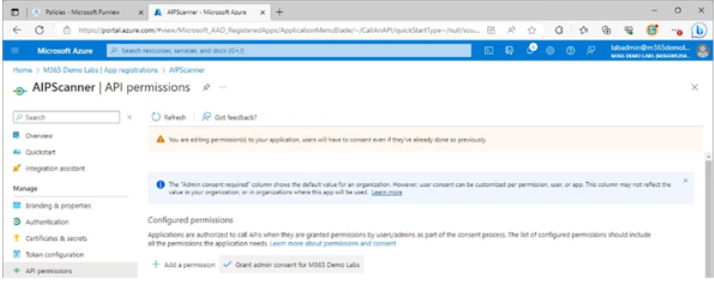
  3. On the API permissions page, click Grant admin consent for . See Figure 11.18:

Figure 11.18 – Granting admin consent

  1. Click Yes to confirm.

With your app registration and client secret details in hand, it’s time to install and configure the actual AIP scanner.